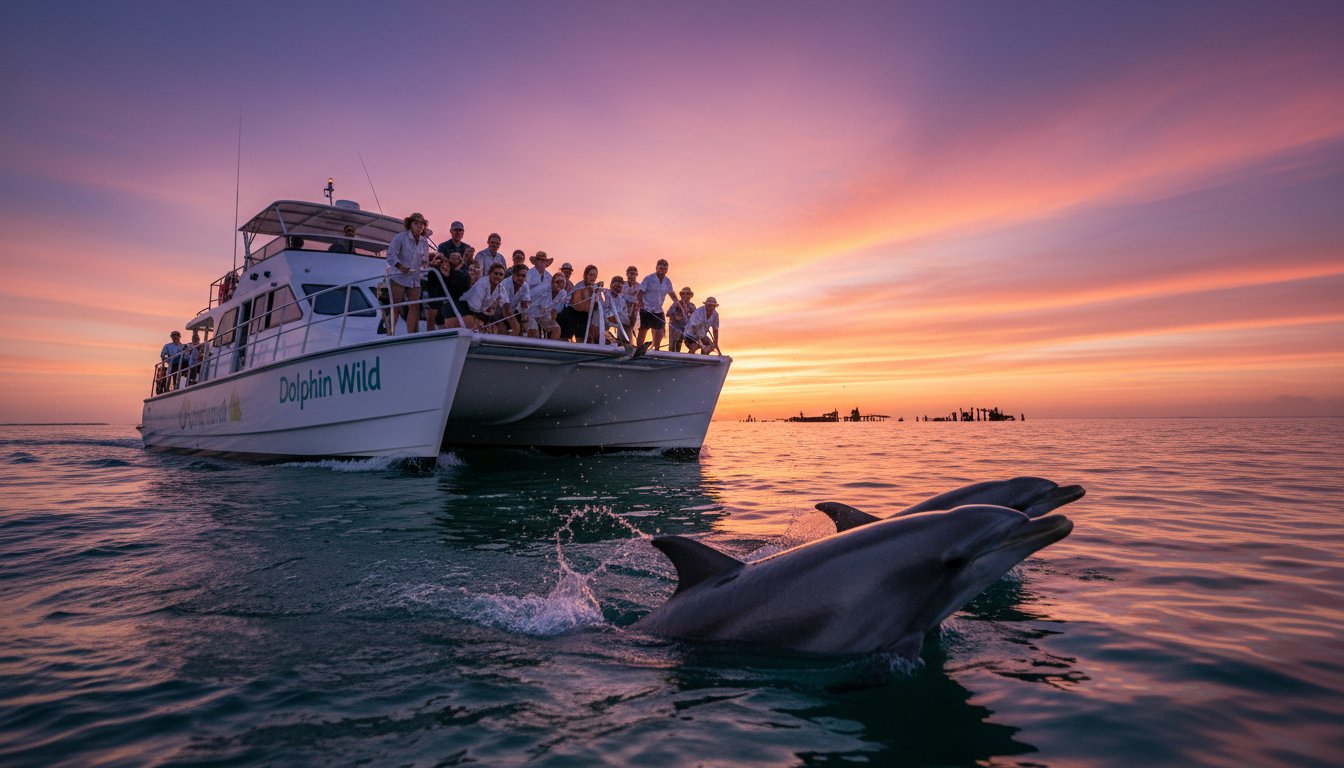
That epic, wrap-around shade you see on Instagram might be the single biggest liability on your rig. We get it, fellow Adventurerz! The dream is pulling up to a remote Aussie campsite, flicking a few latches, and having a massive, protected living space ready in under 90 seconds. It’s the ultimate vision of effortless adventure, offering unparalleled shelter from the scorching sun and sudden downpours, a perfect haven at the side and rear of your 4WD.
But before you drop over A$1,500 on that glorious batwing, it’s crucial to weigh the real-world 270 degree awning pros and cons. That’s why we’re here. We’re diving deep into everything from wind ratings and potential chassis damage to the GVM impact of bolting a 30kg+ beast to your roof rack, helping you decide if this ultimate shade is truly worth the weight for your 2026 setup. Let’s get into it!
Key Takeaways
- Decide if the epic wrap-around shade is the right call for your rig, or if the significant weight penalty is a deal-breaker for your setup.
- Get the real-world breakdown of the 270 degree awning pros and cons, from its incredible 30-second setup to its performance in a proper coastal blow.
- Discover how to match the right awning to your vehicle-from a dual cab to a Troopy-and choose the best materials for tackling Top End sun or Tassie rain.
- Learn the non-negotiable tips for managing the 20-35kg weight on your roof rack and how to secure your awning so it doesn’t take flight in the wind.
What is a 270 Degree Awning and Why is the 4WD Community Obsessed?
If you’ve spent any time at a remote Aussie campsite, you’ve seen one. A massive, wing-like structure unfurling from the side of a 4WD, creating an instant zone of comfort. That, fellow Adventurerz, is a 270-degree awning. Forget the simple, rectangular pull-out bags of yesterday. A 270 is a wrap-around shade system designed to pivot from a single heavy-duty hinge, covering the entire side and rear of your vehicle in one swift motion. It’s the ultimate evolution in mobile shelter.
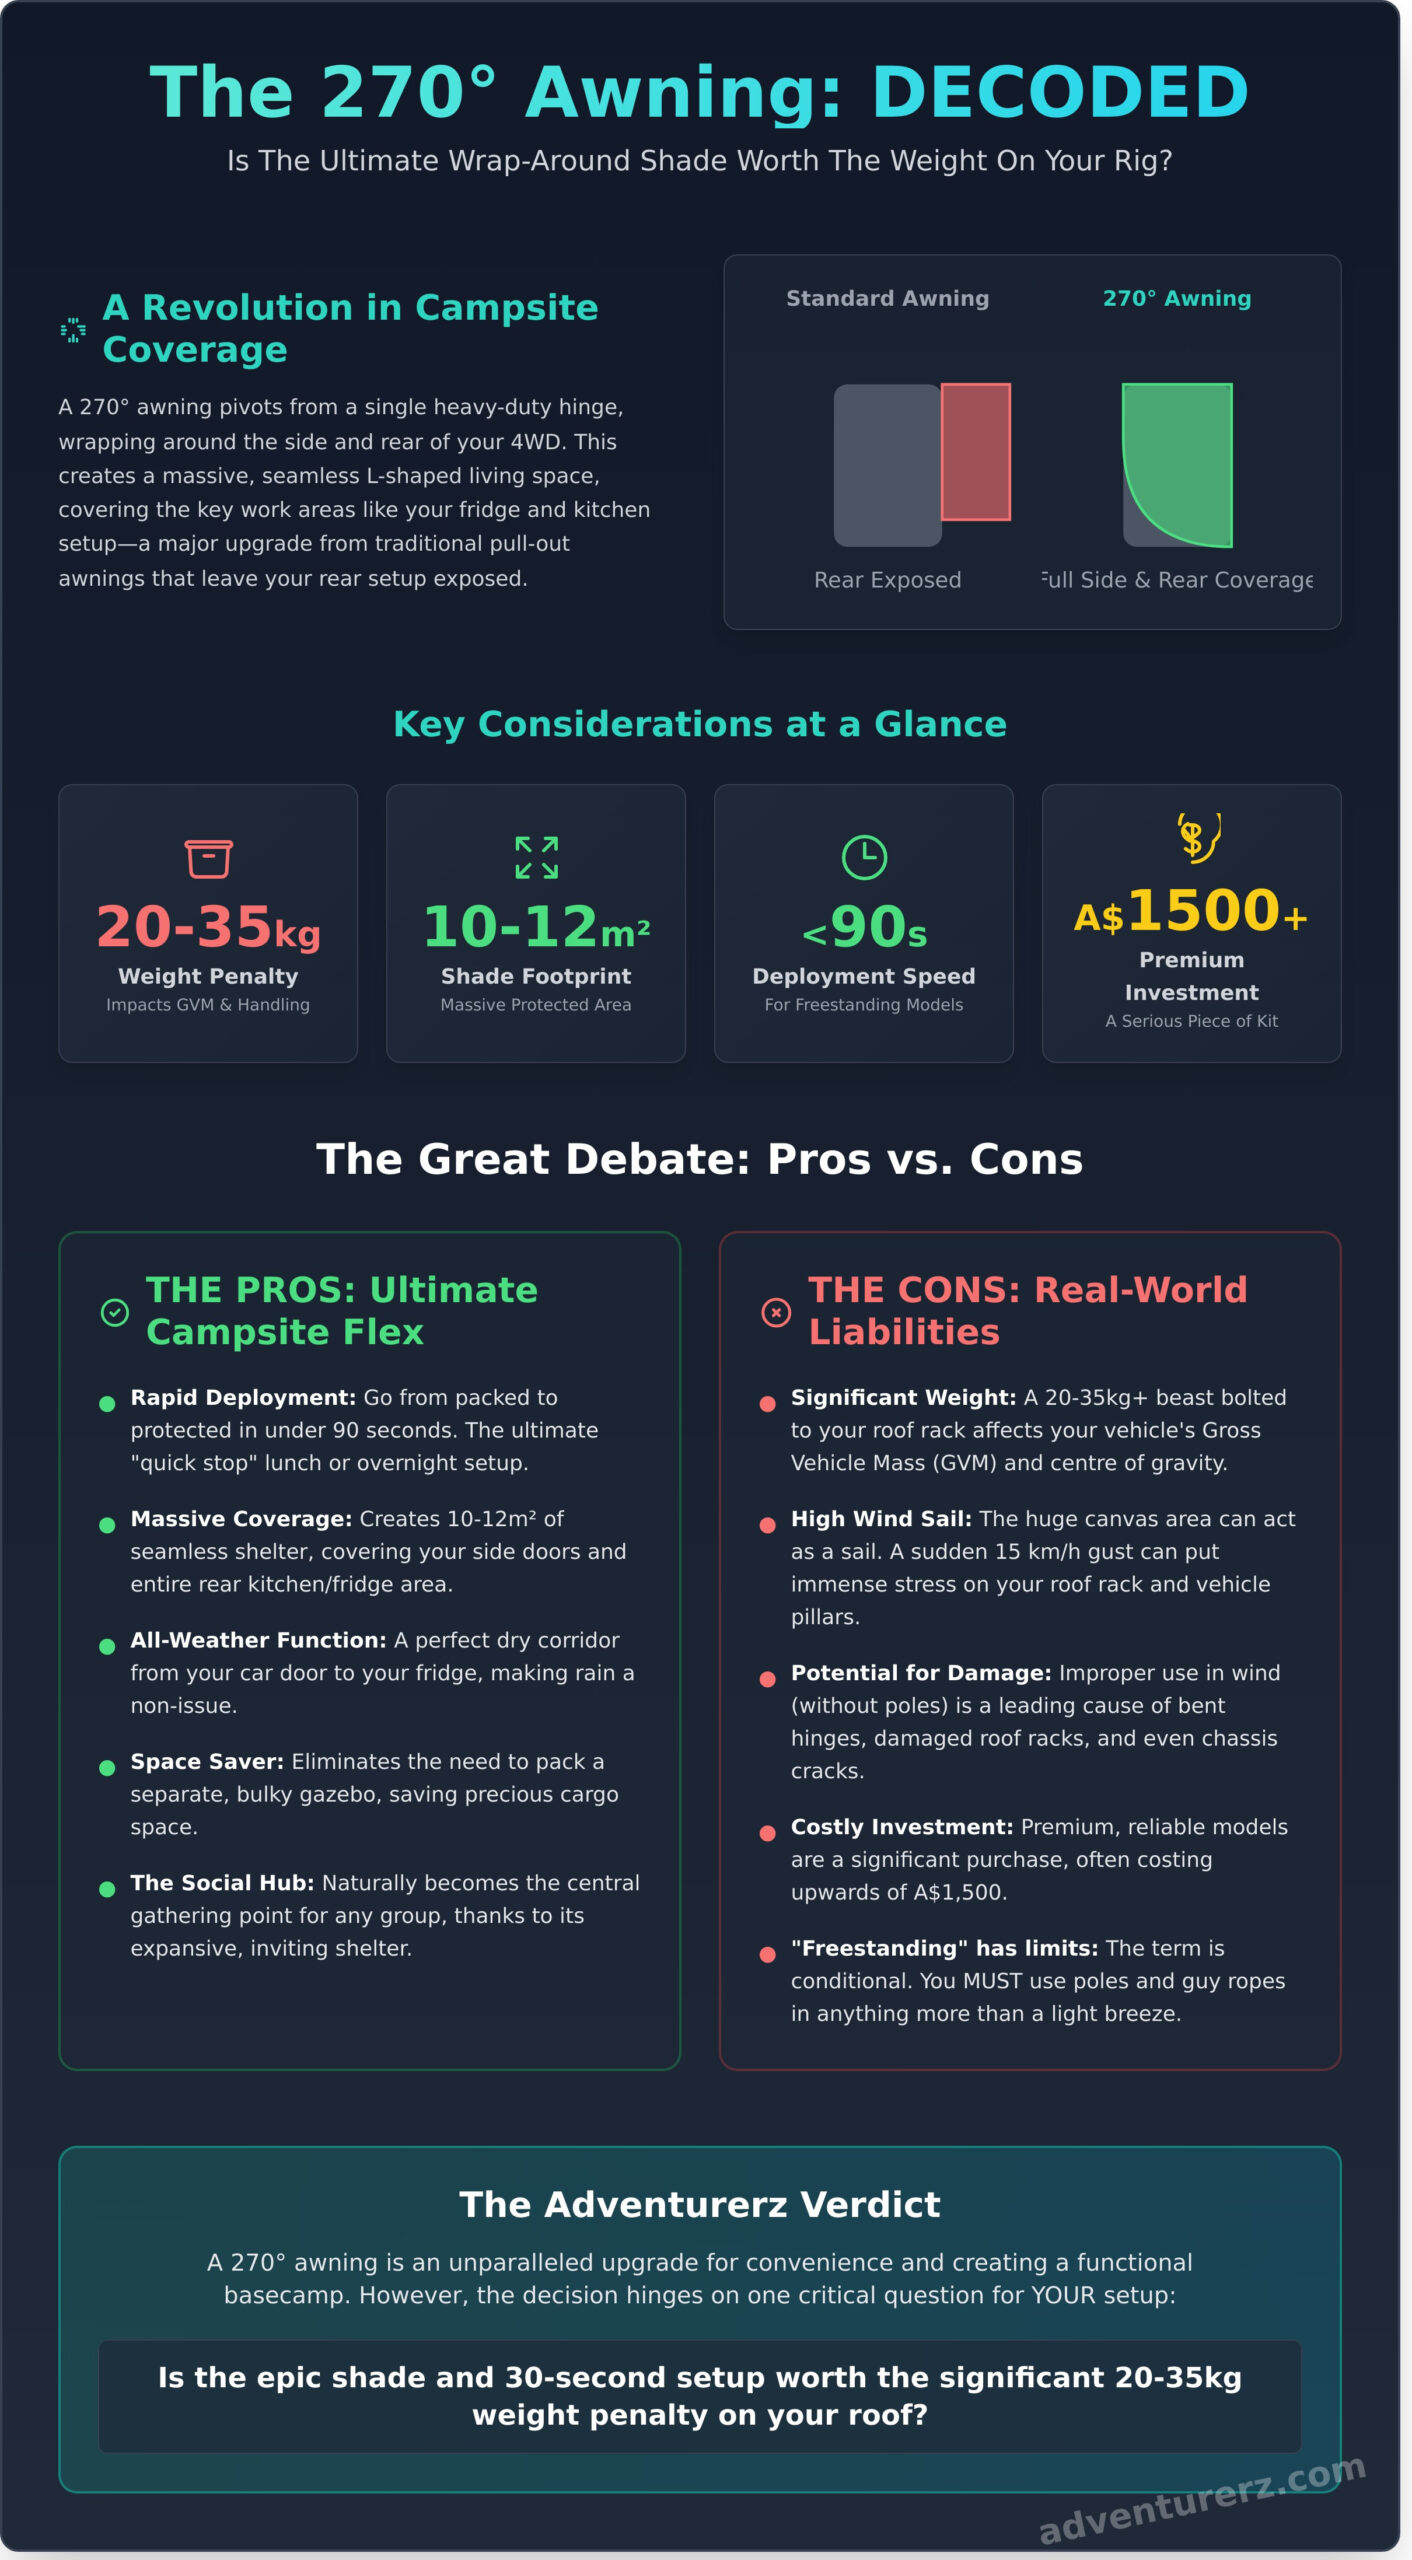
We’ve come a long way from the basic awnings of the early 2000s. While those older models did the job, the 4WD community quickly realised the most crucial real estate was around the rear of the vehicle. This is where we set up our drawers, fridges, and drop-down kitchens! A standard side awning left this entire workspace exposed to the scorching sun or a sudden downpour. The 270-degree awning solved this perfectly, creating a seamless, protected L-shaped living space. This is precisely why it has become the gold standard for serious tourers. If you’re weighing up the 270 degree awning pros and cons, understanding this fundamental shift in camp layout is the first step.
Before we dive deeper, let’s get our lingo straight. You’ll hear terms like hinge strength (the absolute backbone of the system), canvas GSM (Grams per Square Metre, a measure of fabric weight and durability), and the big one: freestanding vs. leg-supported. Getting these basics down will help you make a smarter choice for your rig.
The ‘Batwing’ Style Explained
The magic behind the 270 is its ‘batwing’ or radial arm design. Several alloy arms pivot out from a single robust hinge point, fanning out the canvas to create a massive, continuous shade footprint. We’re talking anywhere from 7 to over 12 square meters of coverage! Most models mount to your roof rack on either the passenger side (the standard for Australian vehicles) or the driver’s side. The canvas itself is typically a rugged ripstop poly-cotton, often around 280 GSM, which offers excellent durability and UV protection compared to lighter, less durable synthetic polyester options.
Freestanding vs. Pole-Supported Models
A true freestanding awning is the ultimate Adventurerz flex. Pulling up for a quick lunch on the track and deploying a 10-square-meter shade zone in under 60 seconds without touching a single pole feels incredible. This convenience comes from massively over-engineered hinges and arms designed to support the awning’s weight. The trade-off? They are heavier and often carry a premium price tag of over A$1,500. But here’s a critical piece of advice: even with the toughest freestanding model, you should always use the supplied poles if there’s more than a slight breeze. A 15 km/h gust can catch that huge canvas sail and put enough force on your roof rack to cause serious damage. Poles provide security and peace of mind when you need it most.
The Pros: Why a 270 Awning is the Ultimate Campsite Flex
Let’s get straight to it. A 270-degree awning isn’t just a piece of canvas; it’s a statement. It’s the difference between merely camping and creating a genuine, functional basecamp. When we, as Adventurerz, pull up to a spot after a long day on the tracks, the goal is to get comfortable, fast. This is where the 270 shines, transforming your 4WD into the heart of the campsite in literal seconds.
The sheer amount of coverage is the first, most obvious win. We’re talking about an instant 10 to 12 square metres of shade and shelter that wraps around the side and rear of your vehicle. Think about your setup. Your fridge slide is at the back, your camp kitchen is set up along the side, and you need to get in and out of the passenger door. A 270 awning covers all three points simultaneously. No more shuffling a small square awning around to chase the shade!
This leads to its second massive advantage: speed. A modern freestanding 270 goes from packed away to fully deployed in under 30 seconds. Unzip the bag, swing the single arm out, and you’re done. That’s it. Compare that to wrestling with a separate 3×3 metre gazebo, which can take two people a solid 5-10 minutes. When you’re weighing up the 270 degree awning pros and cons, this incredible speed is a massive tick in the ‘pro’ column. It’s the difference between cracking a cold one while the sun sets or fumbling with poles in the dark.
And what about when the weather turns? A 270 creates a perfect dry corridor from your driver’s seat to your fridge. You can grab supplies, cook a meal, and hop back in the cab without getting drenched. This functional, protected space naturally becomes the social hub of any group trip. It’s where everyone gathers for a yarn, drawn in by the epic shelter and easy living.
Efficiency in the Bush
A single 270 awning immediately eliminates the need to pack a bulky gazebo, saving precious space and weight. But the efficiency goes further. Many premium models, like those from Darche and Oztent, now come with integrated, dual-colour LED lighting strips. This means no more messing with head torches while you’re trying to chop onions. It’s a small detail that makes a huge difference. Plus, by casting a huge shadow over your vehicle, the awning can lower the panel temperature by up to 15°C, significantly reducing the workload on your 12V fridge and saving your battery.
Versatility and Wall Kits
This is where a 270 truly becomes a game-changer. With optional zip-on wall kits, your simple shade wing transforms into a fully enclosed ‘outdoor room’. Facing the brutal, low-angle afternoon sun in the QLD tropics? Zip on a wall. Trying to keep your camp stove from blowing out in a classic West Australian coastal breeze? Create a windbreak in seconds. These walls provide privacy, extra weather protection, and an incredible amount of extra living space. Seeing how different wall kits can transform a setup is mind-blowing. We’ve compared some of the top options in our Complete 4WD Awning Guide.
The Cons: Weight, Wind, and the Reality of Solo Setups
Alright Adventurerz, let’s get real. We’ve seen the epic Instagram shots and the dream of instant, sprawling shelter. But before you drop over A$1,500 on a new rig accessory, it’s our job to walk you through the other side of the coin. The brilliant coverage comes with some serious trade-offs, and understanding these is the key to making a smart choice. This isn’t about scaring you off; it’s about preparing you for the realities of the track.
The most immediate factor is the sheer weight. Most quality 270-degree awnings tip the scales between 20kg and a hefty 35kg. That’s like strapping four full jerry cans to the highest point of your 4WD. This dead weight lives up there, 24/7, affecting everything from your fuel economy to your vehicle’s fundamental stability. It’s a critical part of weighing the 270 degree awning pros and cons.
Vehicle Dynamics and Payload
Bolting 30kg of aluminium and canvas to your roof rack fundamentally changes how your vehicle behaves. On a steep, off-camber track in the Victorian High Country, that high-mounted weight raises your centre of gravity, making a rollover more likely. You’ll also feel the constant leverage and torque on your roof rack mounts, especially after 500km of relentless corrugations on the Oodnadatta Track. Your Gross Vehicle Mass (GVM) is the maximum legal weight of your fully loaded vehicle, and every kilogram added by an awning is a kilogram you can’t use for water, fuel, or food.
The Wind Risk Factor
Wind is the ultimate enemy of the 270 awning. Their massive surface area acts like a giant sail, catching even moderate gusts. Many brands market their awnings as “freestanding,” but we’ve seen hinges on A$2,000+ units snap clean off in a sudden 20-knot (37 km/h) gust. It can happen in seconds. When that happens in a remote spot, you’re not just fixing it with duct tape. You’re looking at:
- Complex Repairs: A broken cast alloy hinge isn’t something you can weld at the campsite.
- Expensive Parts: A single replacement hinge or arm assembly can cost upwards of A$250, plus shipping to a remote town. Often, it’s more economical to replace the entire unit.
- Psychological Stress: Ever tried sleeping in your swag at Seal Rocks, NSW, while a coastal southerly is blowing? The constant flapping and worrying if your expensive awning will survive the night is a genuine downside. You’ll find yourself packing it away when you need it most.
Finally, let’s talk about the ‘solo struggle’. While deploying most 270 awnings is a one-person job, packing one away alone in the wind and rain is a different story. You’re trying to fold multiple large, heavy, and often wet arms back into a bag while fighting the wind. It can be a frustrating, exhausting process that makes you question your purchase. For solo travellers, this is one of the most significant points to consider when evaluating the 270 degree awning pros and cons. Are you prepared for that battle at the end of a long day?
Choosing the Right Awning for the Australian Outback
Alright Adventurerz, let’s get down to brass tacks. You’ve decided a 270-degree awning is for you, but grabbing the first one you see is a rookie mistake. The right awning isn’t just an accessory; it’s a critical piece of your touring setup, and it needs to be matched to your rig, your destination, and our brutal Aussie conditions. Deciding on the right shelter involves weighing up a complex set of 270 degree awning pros and cons specific to your mission.
Your vehicle is the starting point. Bolting a massive 25kg, 2.5-metre freestanding awning to a Suzuki Jimny with an 80kg dynamic roof load limit is asking for trouble. Conversely, a smaller 2.0-metre model on a LandCruiser Troopcarrier will leave you wanting more coverage. Here’s our quick guide:
- SUVs (Foresters, RAV4s): Stick to lighter, shorter models (around 2.0m) to stay well within your roof load limits.
- Dual Cab Utes (Rangers, HiLuxes): This is the sweet spot. A 2.3m awning mounted to a canopy or quality tub rack provides epic coverage without overloading the chassis.
- Wagons & Troopcarriers (Patrols, LandCruisers): Go big! These rigs can handle the largest 2.5m+ freestanding models, giving you a massive, sheltered living space.
Think about where you’re headed. An awning built for Tassie’s relentless rain might not be the best choice for the scorching sun of the Top End. For northern adventures, a UPF 50+ rating and mould-resistant canvas are non-negotiable. Down south, you need to look for a high water-head rating; a minimum of 1500mm is essential, with premium options hitting 3000mm+. The final piece of the puzzle is support. An Australian-backed warranty with locally available spare parts is worth its weight in gold when a hinge fails 400km down the Gibb River Road.
This brings us to the big question: the A$400 ‘budget’ wing versus the A$2000+ ‘premium’ build. The cheaper option might seem tempting, but it often uses thinner 280gsm polyester and basic cast alloy hinges. The premium models invest in heavy-duty 320gsm+ poly-cotton canvas, CNC-milled components, and robust 3 to 5-year warranties. The real cost isn’t the price tag; it’s the potential failure in the middle of nowhere.
Material Science for Adventurerz
Let’s talk materials. A poly-cotton canvas blend is our top pick for Aussie touring. It breathes far better than pure polyester, drastically reducing condensation on those cold desert nights, and its robust weave stands up better to the abrasive red dust. For hinges, avoid brittle cast aluminium. Look for CNC-milled steel or reinforced nylon components that offer superior strength and flex on corrugated tracks. Many premium setups now include gas struts, making a one-person, 90-second setup a reality!
Installation and Mounting Secrets
Your mount is your foundation. Two simple L-brackets are not enough for the leverage a 20kg+ awning exerts on rough roads. We strongly recommend a minimum of three heavy-duty brackets, or even better, a vehicle-specific one-piece mount. Follow the ‘overhang’ rule: ensure no more than 300mm of the awning’s packed body extends past your last bracket. For rigs with rear-mounted spares or ladders, use bracket spacers to achieve the perfect clearance without compromising strength.
Feeling overwhelmed by the options? We get it. That’s why we’ve done the hard yards for you. Check out our team’s tested reviews of Australia’s top 270 awnings to find your perfect match.
Maintenance, Sustainability, and the Adventurerz Way
Buying a 270 degree awning isn’t just a purchase; it’s an investment in your future adventures. Here at Adventurerz, we believe in gear that lasts a decade, not just a single season. Choosing quality equipment is the first step toward eco-conscious camping. It means less waste in landfill and more time spent under the stars. A well-maintained awning becomes a reliable partner, a backdrop to countless memories from the High Country to the Kimberley coast.
This commitment to longevity is at the heart of the Adventurerz tribe. We don’t just use our gear; we care for it, repair it, and share our knowledge so everyone can get the most out of their setup. It’s about being a considerate traveller, both to the environment and to your own back pocket!
Long-term Care for Your Investment
A top-tier 270 awning can easily last over 10 years with proper care. The number one rule is the ‘dry-before-you-stow’ rule. Packing away a damp canvas awning, even for 48 hours, is a recipe for mildew and rot that can permanently weaken the fabric. If you have to pack up in the rain, make sure you fully open it to dry within 24 hours. After a dusty trip through the Simpson Desert, a quick spray of dry silicone lubricant on the hinges prevents grinding and premature wear on parts that can cost over A$150 to replace. For small rips, a Tear-Aid Type A patch is a brilliant on-the-road fix that will hold strong until you can apply a more permanent canvas patch back home.
The Final Verdict: Who Needs a 270?
After weighing all the 270 degree awning pros and cons, the decision really boils down to your personal touring style. So, who is this awesome piece of kit really for?
- The Long-Haul Tourer & Families: If you’re setting up a base camp for multiple days or have kids running around, the massive, instant shelter is a game-changer. It creates a genuine outdoor living room, protecting you from the harsh Aussie sun and sudden downpours. For you, the benefits far outweigh the higher initial cost of A$1,200 to A$2,500+.
- The Solo Adventurer: The ease of a one-person setup is a massive win. Being able to deploy a huge amount of shelter in under 60 seconds without help makes life on the road simpler and safer.
And who should probably stick to a simpler side-pull awning?
- The Weekend Warrior: If your trips are short and you just need quick shade for a lunch stop, a traditional A$200-A$400 side awning is lighter, cheaper, and does the job perfectly well.
- The Budget-Conscious Builder: If your funds are tied up in critical recovery gear or mechanical upgrades, a 270 might be a luxury you can add later. There’s no shame in building your rig piece by piece!
Joining the Community
Your journey with your gear doesn’t end after you buy it. It’s just beginning! We want to see your rig in action. Share your setup photos and trip reports with the Adventurerz tribe on our forums. Ask questions, get advice, and inspire others. Our community is packed with expert mentors ready to share tips on everything from sustainable camping practices to the best tracks they’ve discovered. It’s about exploring together and leaving the bush better than we found it. When you’re ready to dive deeper into the world of vehicle shelters, we’ve got you covered. Check out our latest 4WD awning reviews and community recommendations!
So, Is a 270 Awning Your Next Rig Upgrade?
Deciding on a 270-degree awning is a massive call for any 4WD setup. You get an incredible 12 square metres of instant shade, completely transforming your campsite into an outdoor living room. But you can’t ignore the trade-offs. These units add a significant 25-40kg to your roof load and can be a real handful for a solo adventurer in a 30 km/h coastal wind. Ultimately, weighing the 270 degree awning pros and cons comes down to your personal travel style and how you use your rig out on the tracks.
Making that final choice doesn’t have to be a solo mission. That’s what our community is for! We’re a tribe of Adventurerz sharing honest, community-vetted gear recommendations forged on Australia’s toughest trails. We focus on responsible exploration and have the expert 4WD knowledge to back it up. Ready to find the perfect gear for your adventure? Join the Adventurerz community for expert gear reviews and travel tips! Here’s to finding the perfect shade for your next epic trip!
Frequently Asked Questions About 270 Awnings
Can one person set up a 270 awning alone?
Absolutely! Most modern 270 awnings from brands like Darche or Bushwakka are specifically designed for a solo setup in under 90 seconds. You simply unzip the bag, swing the awning arm around your vehicle, and secure the final strap. It’s a massive leap forward from older, more cumbersome models. This ease of use is a huge plus for solo Adventurerz hitting the tracks and a major pro when considering the 270 degree awning pros and cons.
Are 270 degree awnings really freestanding in the wind?
Yes, but with a serious dose of caution. Most quality awnings can handle a light breeze up to about 25 km/h without their support poles. However, we always recommend using the integrated poles and guy ropes if the wind picks up. A sudden gust can cause upwards of A$700 in damage to the hinges. Don’t risk it; always secure your gear for the conditions you’re in, not the conditions you hope for!
How much weight does a 270 awning add to my roof rack?
A 270 awning typically weighs between 25kg and 35kg, depending on the brand and materials. For example, the Darche Eclipse 270 Gen 2 weighs around 33.5kg. It’s vital to check your roof rack’s dynamic load rating (the weight it can carry while moving). You must ensure the combined weight of your rack and the awning doesn’t exceed this limit, as it affects your vehicle’s centre of gravity and handling off-road.
Do I need a specific roof rack to mount a 270 awning?
You definitely need a robust roof rack system. Standard factory crossbars usually aren’t strong enough to handle the leverage of a 270 awning, especially on corrugated Aussie roads. We strongly recommend a platform-style rack, like a Rhino-Rack Pioneer, or a set of at least three heavy-duty crossbars with a dynamic load capacity of over 100kg. This ensures a secure mounting point that won’t fail you out in the bush.
What is the difference between a 270 and a 180 degree awning?
The main difference is the massive increase in coverage! A 180-degree awning runs straight along the side of your 4WD, giving you about 7 square metres of shade. A 270-degree awning, however, pivots around the rear corner, wrapping around the side and back of your vehicle. This creates a huge sheltered area of 10-12 square metres, which is perfect for protecting your camp kitchen and chairs from the harsh sun.
Is it worth getting the walls for a 270 awning?
If you camp in all seasons, then 100% yes! Adding walls, which can cost between A$700 and A$1,200, transforms your awning from a simple sunshade into a fully enclosed, weatherproof room. This gives you an incredible private space, protected from wind, rain, and Aussie insects. It’s a game-changer for extended trips or camping with the family, offering a comfortable base camp no matter the weather.
How do I stop my 270 awning from pooling water when it rains?
You have to create a runoff point. When rain is forecast, use one or two of the built-in telescopic poles to lower a corner of the awning fabric. This creates a slope, forcing rainwater to run off instead of collecting in the middle. A pool of water can easily add over 40kg of weight to the canvas, putting immense strain on the frame and risking catastrophic failure. A little prep goes a long way!
Which side of the car should I mount my 270 awning on?
In Australia, always mount your awning on the passenger side (the left-hand side). This is a critical safety measure. When you pull over on the side of the road, your awning will open away from traffic, creating a safe, protected area. Mounting it on the driver’s side would mean deploying it directly into the path of passing vehicles, which is incredibly dangerous for you and other road users. Stay safe out there!