A single loose T-bolt on the Gibb River Road is all it takes to turn a dream 4WD adventure into a recovery nightmare. We’ve all been there, standing on the rear tyre with a spanner in hand, second-guessing if those channel nuts are truly locked in or if the tent will shift the moment we hit the dirt. It’s a common anxiety for Adventurerz who want the sleek profile of a flat rack but worry about T-slot compatibility and exceeding roof load limits. Learning how to install a roof top tent on a platform rack shouldn’t feel like a high-stakes guessing game.
We agree that your peace of mind is just as important as your gear’s security. That’s why we’ve developed this expert installation framework to help you master the technical nuances of mounting your setup for 2026. You’ll gain the confidence to handle specialized hardware and calculate weight safety with precision, ensuring a secure, rattle-free home away from home. We’ll walk you through every step from torque settings to space optimization, so you can fit your awning and recovery boards without breaking a sweat.
Key Takeaways
- Master the crucial difference between static and dynamic load ratings to ensure your platform rack safely supports your crew and gear across the rugged Australian outback.
- Learn how to install a roof top tent on a platform rack using T-slot nuts and specialty brackets for a flush, secure mount that outperforms standard sandwich clamps.
- Discover the “sweet spot” for tent placement to balance vehicle weight distribution, maximizing your fuel economy while leaving room for essential off-the-grid accessories.
- Protect your investment and your fellow Adventurerz with our critical 50km post-installation safety checklist and expert tips for managing wind noise on the highway.
- Get our pro techniques for the “Big Lift,” ensuring you and your mates move the tent onto the rack safely without damaging your vehicle or your equipment.
Understanding Weight Ratings and Platform Rack Compatibility
G’day Adventurerz! Before we get into the heavy lifting of how to install a roof top tent on a platform rack, we need to talk about the foundation of your setup. In 2026, vehicle safety standards and engineering have shifted to prioritize lower dynamic centers of gravity. This makes platform racks the absolute gold standard for stability. Unlike traditional crossbars that focus weight on two thin points, a platform distributes the load across a wider surface area. This reduces body roll and keeps your rig planted when you’re tackling corrugated tracks in the Kimberley or cruising the Great Ocean Road.
Choosing a platform rack isn’t just about looks; it’s about structural integrity. We always recommend these systems because they offer multiple mounting channels, which gives you more flexibility when positioning your tent for optimal wind resistance and weight distribution. By spreading the load, you’re protecting your vehicle’s roof skin and ensuring your setup remains rock-solid for years of off-grid exploration.
Static vs. Dynamic Loads Explained
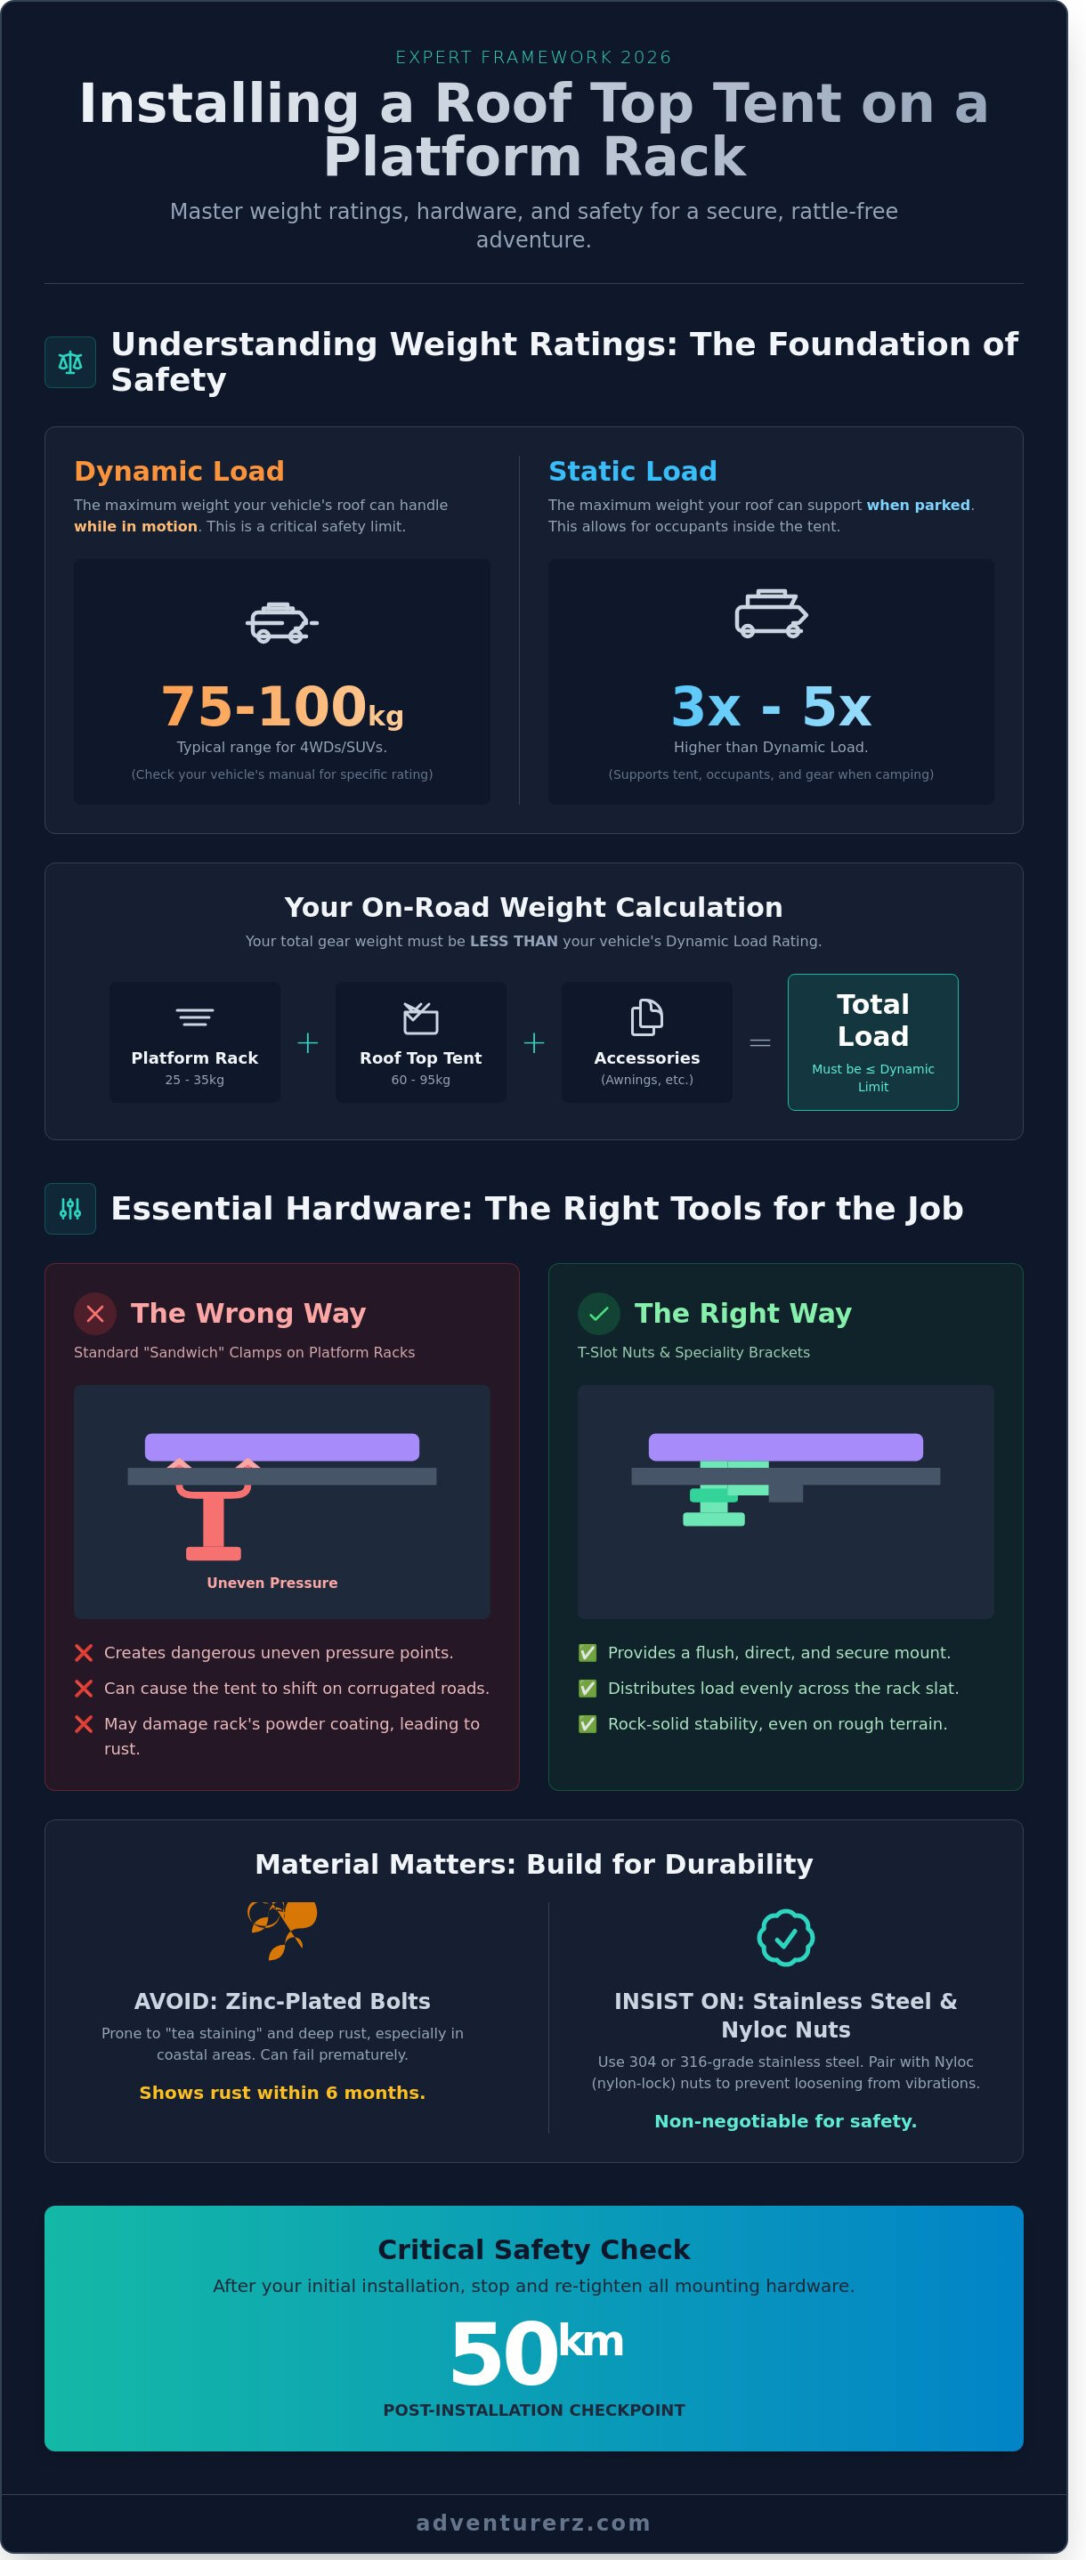
Dynamic load is the weight limit your vehicle can safely carry while it’s in motion. This figure is non-negotiable because it accounts for the massive G-forces generated during emergency braking or sharp cornering. You’ll find this specific rating in your vehicle manufacturer’s manual, usually ranging from 75kg to 100kg for most modern 4WDs and SUVs.
The static load refers to the weight the roof can support when the vehicle is parked. This is typically three to five times higher than the dynamic rating. This higher capacity is what allows the roof to support the combined weight of the rack, the tent, and the Adventurerz sleeping inside without collapsing the pillars. Always verify these figures before you buy, as exceeding them can void your insurance and compromise your safety on the road.
Is Your Platform Rack RTT-Ready?
Not every flat deck is ready for a heavy tent straight out of the box. You need to inspect the components of a roof rack system to ensure they’re rated for high-stress loads. We prefer “backbone” systems that bolt directly into the vehicle’s factory mounting points or internal frame. These provide much better weight distribution than simple gutter-mount feet, which can stress the roof’s outer edges.
Check your slat spacing and orientation. Most roof top tents require the mounting rails to run perpendicular to the rack slats for a secure fit. If your platform has longitudinal slats, you might need specific adapter kits or additional cross-slats to provide the necessary support. To calculate your total load, use this simple formula:
- Platform Weight: Usually 25kg to 35kg.
- Tent Weight: Ranges from 60kg for soft-shells to 95kg for hard-shell models.
- Accessories: Add the weight of any mounted shovels, recovery boards, or fuel cans.
If your combined gear weighs 92kg and your dynamic limit is 100kg, you’re ready to roll. If you’re over that limit, it’s time to reconsider your gear choices to ensure you stay compliant with Australian road regulations and keep your tribe safe during the journey.
Essential Hardware: Brackets, T-Bolts, and Adapters
We’ve all seen it happen at the campsite. A mate uses those basic “sandwich” clamps on a flat platform and wonders why the tent shifts after just 40 kilometres on a corrugated track. Those standard clamps are designed for thin, oval crossbars, not the wide, flat slats of a modern platform. When you force them onto a flat surface, they often create uneven pressure points that can bow your rack or strip the protective powder coating, leading to rust. We want a setup that’s as tough as the Simpson Desert, which means moving away from generic hardware.
Choosing the right materials is the first step in a responsible build. Standard zinc-plated bolts will likely show signs of “tea staining” or deep rust within 6 months if you live near the coast. We insist on using 304 or 316-grade stainless steel for every component. Pair these with nylon-lock (Nyloc) nuts. These nuts feature a specialized plastic insert that grips the bolt thread. It’s a non-negotiable safety feature that prevents your tent from rattling loose during high-vibration off-road treks. If you haven’t picked out your shelter yet, check out our collective’s top picks for roof top tents to see which models pair best with high-end hardware.
The Magic of T-Slot Integration
The secret to how to install a roof top tent on a platform rack with a professional finish lies in the T-slot. Most Australian platforms, including Rhino-Rack and Kings, feature channels built into the slats. T-bolts or channel nuts slide directly into these tracks, allowing the tent to sit much lower. A 2024 wind tunnel test by local enthusiasts showed that mounting a tent flush to the rack can reduce wind drag by up to 12% compared to using bulky universal spacers. Before you buy, grab a digital calliper. You need to verify if your rack uses an 8mm or 10mm channel width, as mixing these up will lead to a loose, dangerous mount.
Specialized RTT Mounting Brackets
Sometimes the tent’s internal rails don’t align perfectly with your platform’s slats. This is where specialized brackets save the day. High-clearance brackets provide just enough room to get a spanner underneath without scraping your knuckles. If you’re a weekend warrior who needs the rig for the Monday morning school run, consider a quick-release system. While these kits can cost between A$250 and A$450, they allow you to remove the tent in under 5 minutes. We always look for brackets with eco-friendly E-coat finishes. This triple-stage coating process is more sustainable than traditional chrome plating and offers superior salt-spray resistance for those long trips along the Great Ocean Road.
Strategic Positioning: Balancing Weight and Accessory Clearance
Positioning your gear isn’t just about where the bolts fit; it’s about vehicle dynamics and trail safety. When we’re teaching fellow Adventurerz how to install a roof top tent on a platform rack, we always start with the “sweet spot” located between the front and rear axles. Centering the bulk of your 65kg to 90kg tent here prevents the vehicle from becoming nose-heavy or light in the steering. Proper weight distribution ensures your suspension works as intended when you’re hitting those corrugated tracks in the Kimberley or the High Country.
Aerodynamics play a massive role in your touring budget. A tent placed too far forward can create a massive air pocket, increasing fuel consumption by up to 15 percent at 110km/h. By shifting the tent slightly back or using a wind deflector, we’ve seen fuel savings of 1.2 litres per 100km on modern 4WDs. You also need to visualize the tent in its “open state” before tightening a single bolt. We’ve seen many excited campers realize too late that their tent blocks the tailgate from opening fully or crushes a shark-fin antenna.
Offsetting for Awnings and Gear
Most platform racks offer enough width to mount your tent to one side. This is a pro move if you want to integrate one of the best 4wd awnings for a complete camp setup. Offsetting the tent creates a dedicated “service side” for recovery boards, MaxTrax, and 20-litre fuel cans. If your tent is offset, we recommend placing heavier gear like water tanks on the opposite side to balance the vehicle’s lateral lean. A 5-degree tilt might not seem like much, but it affects tyre wear and high-speed cornering stability on the tarmac.
Rear-Opening vs. Side-Opening Considerations
Your choice of tent orientation dictates your entire campsite flow. A rear-opening tent provides a natural porch over your tailgate kitchen, which is brilliant for rainy nights. However, you must ensure the ladder doesn’t block access to your fridge slide or storage drawers. Side-opening tents are often preferred for narrower vehicles to keep the ladder footprint within the width of the car. When you plan how to install a roof top tent on a platform rack, check the swing path of 270-degree awnings. These often require 20cm of clearance from the tent shell to deploy their arms without snagging the canvas or hardshell casing.
Step-by-Step Installation: Securing Your Tent to the Platform
Before we heave that heavy gear onto the roof, preparation is everything. Start by cleaning your platform channels with a stiff brush and a damp cloth. Dust and grit trapped in the T-slots can lead to minor abrasions or even galvanic corrosion over thousands of kilometres on corrugated Outback tracks. While the platform is still clear, pre-assemble your mounting hardware. Sliding your bolts or channel nuts into position now saves you from fumbling with small parts while supporting a 75kg weight above your head. Learning how to install a roof top tent on a platform rack effectively starts with this ground-level prep.
The Lifting and Placement Phase
This is the moment where community matters. You’ll need at least two, but ideally four, fellow Adventurerz to assist with the lift. Most hard-shell tents weigh between 65kg and 95kg, which is an awkward load to balance. We always recommend draping thick moving blankets over your vehicle’s rear quarters and the edges of the platform. These blankets protect your paint and the powder-coating of the rack from accidental gouges. Once you lift the tent, set it down gently. Dropping a heavy tent suddenly can cause the aluminium slats to flex or even permanently deform by 2-3mm, compromising the integrity of the rack.
Alignment isn’t just about looks; it’s about fuel efficiency. Use a tape measure to ensure the tent is perfectly squared to the vehicle. A tent that sits just 5 degrees off-centre can increase wind drag by as much as 12 percent at highway speeds, which adds up on long hauls across the Nullarbor. Double-check that you have enough clearance for the rear hatch to open fully and that the tent doesn’t overhang the front windscreen too far, as this creates significant wind noise.
Torquing and Final Adjustments
When you start fastening the bolts, use a cross-tightening pattern similar to how you’d tighten wheel nuts. This ensures even pressure across the entire base of the tent. A torque wrench is a specialized tool used to apply a specific amount of rotational force to a fastener, ensuring it’s tight enough to stay secure without stripping the threads. Most platform rack manufacturers recommend a torque setting between 8Nm and 12Nm for T-bolts, but always check your specific manual.
- Check for Slat Flex: Once tightened, grab the tent and give it a firm shake. There should be zero movement between the tent and the slats.
- Test the Opening: Fully deploy the tent before you call it a day. Ensure the mounting hardware doesn’t interfere with the internal floor or the ladder attachment points.
- Edge Clearance: Confirm the tent shell doesn’t rub against any raised side rails or accessory mounts on your platform.
Securing your setup correctly means you can hit the tracks with total confidence. If you’re still deciding on the right shelter for your next journey, explore our range of roof top tents designed for the rugged Australian climate.
Post-Installation Safety and Maintenance for Adventurerz
Once you’ve mastered how to install a roof top tent on a platform rack, your journey is just beginning. We always stress the “50km Check” because hardware inevitably settles under load. Whether you’re hitting local tracks or prepping for a massive trek, those first 50 kilometres are crucial for your safety. Vibrations from the road can loosen even the most secure bolts as the weight of the tent finds its final seating position. Pull over at a safe spot, grab your spanner, and give every nut a firm turn. It’s a simple habit that prevents catastrophic gear failure in the middle of the Simpson Desert.
Vibration and Noise Management
T-slot channels are incredibly versatile, but they often act like a flute at 100 km/h. If you hear a high-pitched whistle, it’s likely air rushing through the open gaps in your rack. We recommend using rubber infill strips to plug these channels. This doesn’t just stop the noise; it reduces the micro-vibrations that wear down your mounting brackets over time. If you experience a deep “tent-hum” on the highway, check the gap between your cab and the tent. A DIY wind fairing or even a strip of heavy-duty automotive edge trim can redirect airflow, which often improves fuel economy by up to 1.5 litres per 100km.
Long-Term Hardware Care
Living in Australia means dealing with salt spray and fine red dust. Both are enemies of your gear. If you’ve been beach driving, rinse your mounting hardware with fresh water immediately to prevent rust. We also look for galvanic corrosion, which occurs when stainless steel bolts react with aluminium racks. A quick spray of lanolin-based lubricant on hinges and mounting tracks every six months keeps everything moving smoothly. Understanding how to install a roof top tent on a platform rack is about more than just the initial bolt-up; it’s about ongoing vigilance.
- Inspect Hinges: Check for grit buildup that can grind down moving parts.
- Secure Your Load: Ensure no straps or zippers are flapping, as these can fray and snap at high speeds.
- Check Torque: Re-verify all mounting points after every 1,000km of corrugated dirt roads.
As Adventurerz, we have a collective responsibility to keep our gear secure. A loose tent isn’t just a hazard to your vehicle; it’s a danger to everyone sharing the road. By maintaining your equipment with a sustainable mindset, you ensure your setup lasts for decades of exploration. Use this solid foundation to start using the ultimate adventure travel planner and begin mapping out your 2026 remote escape with total confidence in your kit.
Ready to Hit the Red Dust?
Mastering how to install a roof top tent on a platform rack is about more than just bolting gear down; it’s about ensuring your setup handles the corrugated tracks of the Kimberley or the soft sands of Fraser Island. We’ve covered the critical 2026 safety standards for dynamic weight loads and the importance of using stainless steel T-bolts to prevent corrosion in salty coastal air. By positioning your tent centrally, you’ll maintain a lower centre of gravity, which is vital when navigating 4WD tracks with a full load. Safety doesn’t end at the driveway. We recommend checking your torque settings every 500 kilometres to account for the heavy vibrations of Australian off-road conditions.
As fellow Adventurerz, we know that the right gear makes the difference between a legendary trip and a breakdown in the bush. Our team provides expert gear reviews based on real-world testing in the harshest environments. We’re proud to lead an eco-conscious travel community that respects the land we explore. Ready to upgrade your rig with equipment that’s built for the long haul? Explore our community-vetted Roof Top Tent recommendations here!
Grab your kit, double-check those brackets, and we’ll see you out there under the stars!
Frequently Asked Questions
Can I install a rooftop tent on a platform rack by myself?
You can technically install a tent alone if you use a ceiling-mounted garage hoist, but we always recommend having at least one mate to help with the heavy lifting. Most tents weigh between 50kg and 95kg, which makes them a literal heavy lift for a single person. Working together ensures you don’t scratch your 4WD or strain your back while positioning the base. It’s the perfect excuse to share a cold drink with the crew after the job’s done.
Do I need to drill holes in my platform rack to mount the tent?
You don’t need to drill into your rack when learning how to install a roof top tent on a platform rack because modern systems use T-slot channels. Brands like Rhino-Rack and Front Runner design their slats with integrated tracks specifically for bolt-on accessories. Using T-bolts or channel nuts keeps your platform’s structural integrity intact. This setup allows you to adjust the tent’s position easily for better weight distribution across your roof.
How much weight can a platform rack actually hold while driving?
Most Australian 4WD roof ratings sit between 75kg and 100kg for dynamic weight, which is the limit while the vehicle is moving. You must subtract the weight of the platform rack itself, which often weighs 20kg to 30kg, from this total capacity. While parked, the static load rating is typically three times higher than the dynamic limit. This allows the rack to support the tent and several Adventurerz without any structural issues.
What is the best way to prevent my rooftop tent from being stolen from the rack?
The best way to secure your gear is by using lockable mounting brackets or specialized security nuts that require a unique key. Many Adventurerz opt for M8 security nuts or brands like Yakima that offer integrated SKS locks. Adding a motion-sensor alarm inside the tent provides an extra layer of protection. These small investments prevent thieves from quickly unbolting your home away from home when you’re parked in high-traffic areas.
Will mounting a tent on a platform rack affect my vehicle’s warranty?
Mounting a tent won’t void your entire vehicle warranty, but it could affect claims related to roof leaks or structural pillar damage if you exceed load limits. Under Australian Consumer Law, a manufacturer can’t reject a warranty claim unless they prove the aftermarket accessory caused the specific fault. We suggest keeping your total load under the 100kg dynamic limit. This ensures you stay within safe operating parameters for your vehicle’s structural design.
How do I know if my T-bolts are the right size for my platform brand?
You’ll know your T-bolts are the right size by measuring the internal width of your platform’s accessory channel, which is usually 8mm or 10mm. Most Australian racks use M8 bolts for heavy accessories like tents to ensure maximum shear strength. If the bolt head slides smoothly into the track but doesn’t spin when you tighten the nut, you’ve found the perfect fit. Always check that the bolt length allows for at least 15mm of thread engagement.
Should I remove the tent from the platform when not in use?
We recommend removing the tent if you aren’t heading bush for more than 14 days to improve your fuel efficiency. Carrying a 70kg tent creates significant wind drag, which can increase your fuel consumption by 10% to 20% at highway speeds. It also reduces the constant stress on your suspension components. Taking it off protects the tent’s outer shell from unnecessary UV damage under the harsh Australian sun during the work week.
Can I mount a hardshell tent differently than a softshell tent on a platform?
Hardshell tents often require a different mounting approach because their fiberglass or aluminum bases are more rigid than softshell frames. When you’re figuring out how to install a roof top tent on a platform rack, remember that hardshells usually need at least three cross-slat contact points to prevent the base from flexing. Softshell tents are more forgiving but still require sturdy brackets to handle the leverage of the fold-out floor when you’re sleeping inside.