Your factory roof rails might look sturdy enough for a weekend away, but they’re often the weakest link between your vehicle and a safe night’s sleep. We know the stress involved in choosing a roof rack for a rooftop tent when you’re staring at conflicting dynamic weight ratings and worrying about permanent damage to your roof channels. It’s a high-stakes decision because a rack that feels safe on the highway can easily fail once you hit the corrugated tracks of the Kimberley or the High Country.
We’ve all felt that pang of anxiety during a heavy crosswind, and we’re here to replace that worry with expert certainty. This guide will help you master the critical math and mounting requirements to safely secure your rooftop tent for any remote adventure. We’ll provide a clear yes or no framework for your specific vehicle, compare the latest 2026 platform systems, and break down how to balance load capacity with fuel efficiency. You’ll gain the confidence to bolt down your gear and head out into the bush knowing your setup is as hardy and reliable as the landscapes we explore together.
Key Takeaways
- Learn the “Moving Math” of dynamic vs. static weight to keep your setup safe whether you’re cruising the highway or sleeping under the stars.
- Identify your vehicle’s structural mounting points to apply the “Weakest Link Rule” when choosing a roof rack for a rooftop tent.
- Evaluate the trade-offs between cost-effective crossbars and high-performance platform racks to maximize your setup’s durability in isolated locations.
- Master the professional installation checklist, from torque specs to aerodynamic positioning, to reduce fuel consumption and environmental impact.
- Connect with the Adventurerz community to swap gear reviews and setup photos, ensuring you “test twice and buy once” for your next expedition.
Decoding Load Ratings: Static vs. Dynamic Weight Explained
Before we bolt anything down, we need to talk about the numbers that keep us safe on the bitumen and the dirt. When you’re choosing a roof rack for a rooftop tent, the most common mistake is looking at a single weight rating and assuming it covers every situation. It doesn’t. We must distinguish between two vital figures: the dynamic load rating and the static load rating. Understanding these ensures we don’t compromise our vehicle’s structural integrity or our own safety while sleeping under the stars.
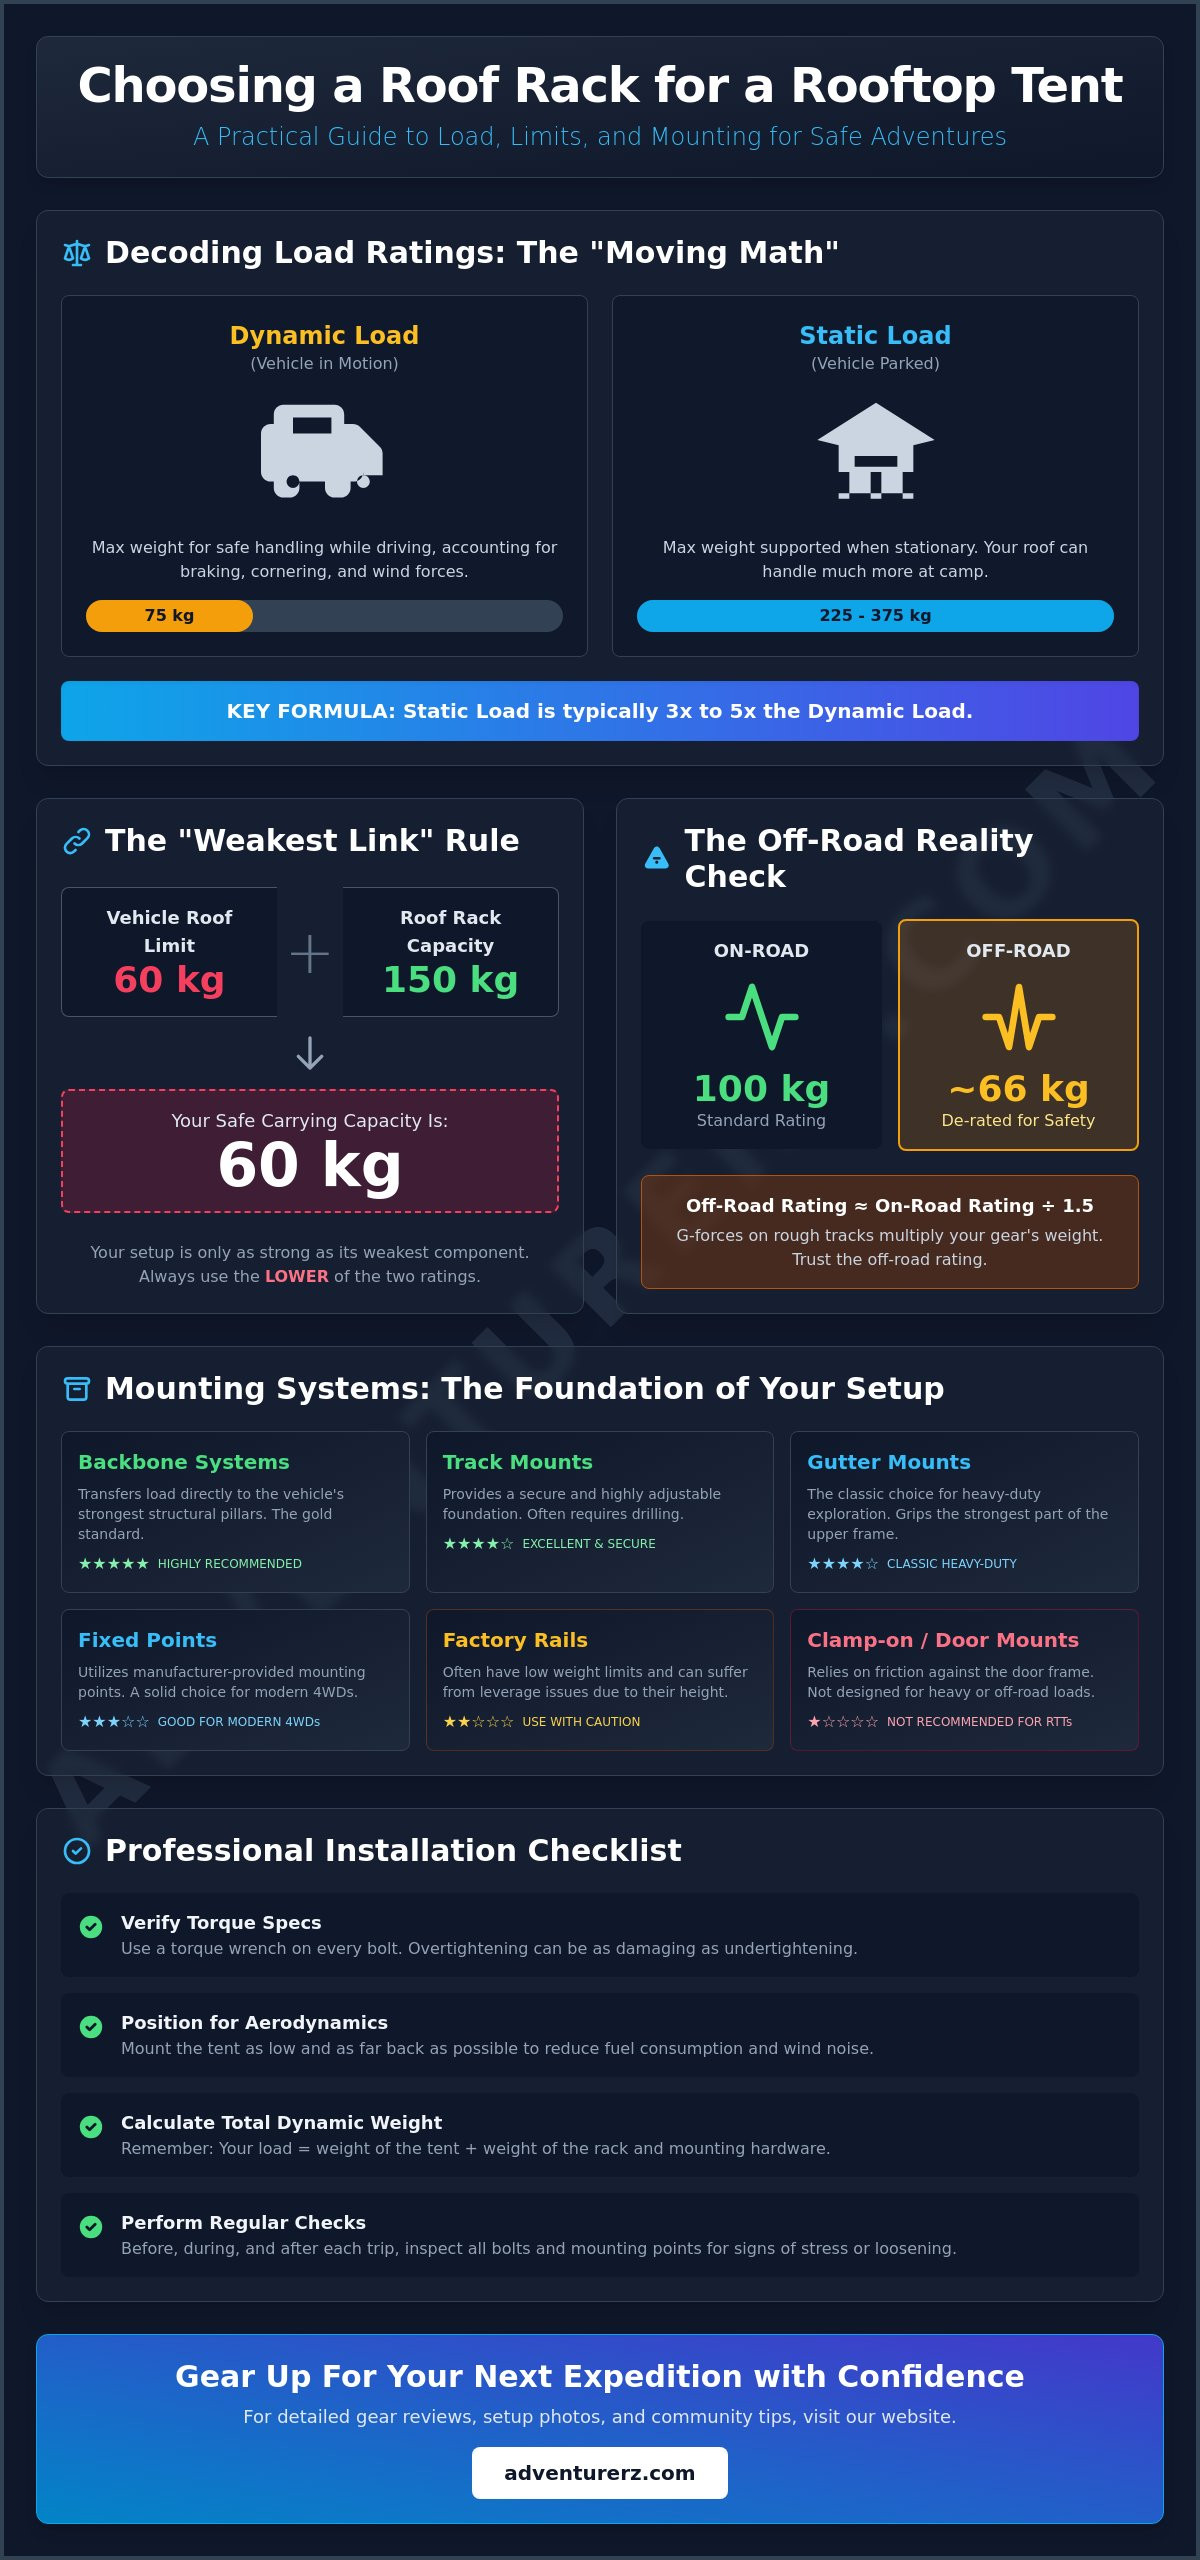
Dynamic Load is the maximum safe weight for vehicle handling and braking while the car is in motion. Static load is the weight supported when the vehicle is stationary, and it’s usually three to five times higher than the dynamic limit. Because a stationary car isn’t dealing with cornering forces, wind resistance, or emergency stops, your roof can handle much more weight at camp than it can on the highway. This is why your roof doesn’t cave in when you and your partner climb into bed, even if your driving limit is only 75kg.
In 2026, Australian safety standards for roof systems have become even more rigorous to account for the growing size of modern adventure rigs. We need to ensure our mounting systems aren’t just “tough enough” but are legally compliant and structurally sound for our specific environment. Exploring the different types of roof racks available is the first step in matching these ratings to your vehicle’s roof limit.
The Math Behind the Load
Let’s get practical with the numbers. If your crossbars have a dynamic rating of 75kg and you want to mount a 60kg tent, you might think you’re in the clear. But we must include the weight of the racks themselves in our calculation. If those bars weigh 8kg, your total dynamic load is 68kg. You’re safe while driving. Once you’re parked, that 75kg dynamic rating typically jumps to a static capacity of 225kg to 375kg. This easily supports your 60kg tent plus 150kg of occupants. If you’re looking for the right gear to start with, check out our latest reviews on roof top tents to see how different weights impact your choice.
Why ‘Off-Road’ Ratings Change Everything
The highway is one thing, but the corrugated tracks of the Outback are another beast entirely. Most manufacturers apply a 1.5x safety buffer for off-road travel. This means if your rack is rated for 100kg on the road, that rating might drop to 66kg or even 50kg once you hit the dirt. Vertical G-forces on rough tracks can effectively double or triple the weight of your tent every time you hit a wash-out. These repetitive impacts test every weld and bolt in your system. When you’re choosing a roof rack for a rooftop tent for a trip across the Simpson Desert, that off-road rating is the only number that truly matters. We always recommend choosing a rack that exceeds your needs by a significant margin for remote exploration.
Assessing Your Vehicle’s Structural Limits
We’ve all seen those incredible setups on social media, but before you hit ‘buy,’ we need to look at the bones of your vehicle. The most important lesson we can share is the ‘Weakest Link’ Rule. Your safe carrying capacity is always the lower of two numbers: the rack’s rating or the vehicle roof’s rating. If you bolt a heavy-duty platform rated for 150kg onto a small SUV with a 60kg roof limit, you still only have 60kg to play with. Exceeding this doesn’t just risk a fine; it can compromise vehicle safety standards by shifting your center of gravity and putting immense stress on the pillars during an emergency maneuver.
Identifying your mounting points is the next step in our journey. Most modern 4WDs use fixed points or tracks, while older rigs rely on gutters. We generally discourage using ‘clamp-on’ door-mount racks for rooftop tents. These systems rely on friction against the door frame, which isn’t designed to handle the massive lateral forces generated by a bulky tent in a crosswind. For serious setups, we often look toward internal ‘backbone’ systems. These clever frames sit inside your roof channels and transfer the weight directly to the vehicle’s strongest structural pillars rather than just the thin roof sheet metal.
Mounting Styles and Structural Integrity
Gutter mounts remain the old-school choice for heavy-duty remote exploration because they grip the strongest part of the vehicle’s upper frame. Track systems are a modern favorite; while they often require drilling into your roof, they provide the most secure and adjustable foundation for choosing a roof rack for a rooftop tent. Be wary of factory raised rails. These can suffer from leverage issues because the weight sits higher off the roof, which increases the stress on the rail feet during cornering. If you’re unsure which tent fits these styles, our guide to roof top tents breaks down the best pairings for different vehicle types.
The Hidden Danger of Roof Channel Stress
We recommend inspecting your roof after every major trip. Look for ‘roof spread’ where the channels might be bowing outward, or small cracks in the paint around the mounting points. These are early warning signs of metal fatigue. If you’re planning on mounting a tent over 65kg, we suggest seeking professional fitment. A pro can ensure the load is perfectly distributed and that all seals are watertight, preventing long-term damage to your pride and joy. It’s about protecting your investment while ensuring you’re ready for the next corrugated track that calls your name.
Crossbars vs. Platforms: Which Mounting System Wins?
Deciding on the right hardware is the next big step after you’ve crunched the numbers on load ratings. When we’re choosing a roof rack for a rooftop tent, we usually find ourselves torn between traditional crossbars and modern flat platforms. While some brands claim platforms are the only way to go, we believe the best choice depends entirely on your specific vehicle and how you plan to travel. Crossbars are the lightweight, cost-effective champions of the minimalist world. They keep your setup simple and are often more fuel-efficient due to their lower profile and reduced wind resistance. However, they offer a smaller surface area, which means the weight of your tent is concentrated on two or three specific points rather than spread across a wide base.
Platform racks are the heavy-duty alternative that many of our community members prefer for serious remote touring. These systems offer maximum surface area, which distributes the weight of the tent more evenly across your vehicle’s roof channels. This is a game-changer for vehicles with track systems, where spreading the load prevents the track from pulling away from the roof under heavy vibration. One often overlooked benefit is the ‘Height Factor.’ Because many platforms mount lower to the roof than a set of bars on tall legs, they can actually lower your tent’s overall profile. This extra 30mm to 50mm of clearance can be the difference between parking in your garage and being stuck on the driveway.
When to Choose Heavy-Duty Crossbars
We recommend heavy-duty crossbars for soft-shell tents and solo travelers who want to keep their rig nimble. If you’re choosing the right roof top tent for a bar setup, focus on models that align with your bar spread. The distance between your bars is critical for stability; a spread that’s too narrow can lead to the tent flexing or vibrating at highway speeds. We also suggest checking your tent’s mounting hardware. Many 2026 tent models come with brackets designed for specific bar shapes, so ensure yours will clear the wide aero profiles common on modern racks.
The Case for Flat Platforms
Platforms truly shine when you need to carry more than just a bed. Their integrated T-slots make it easy to bolt on accessories like 4WD awnings, recovery boards, or solar panels right alongside your tent. This versatility is a huge plus for longer expeditions where every square inch of roof space counts. By utilizing these T-slots, you can achieve a secure, low-profile mount that minimizes drag and keeps your gear tucked away from low-hanging branches. It’s about building a system that respects the environment by being efficient while providing the durability needed for the rugged tracks we love.
The Installation Checklist: Safety, Drag, and Sustainability
Once we’ve finished choosing a roof rack for a rooftop tent, the focus shifts to the hands-on work of bolting it all together. We don’t subscribe to the “she’ll be right” school of thought here. A poorly installed rack is a hazard to you and a burden on the environment. Proper fitment ensures your gear stays attached during a sudden stop and minimizes the footprint we leave on the tracks. Follow this checklist to ensure your rig is ready for the long haul.
- Step 1: Torque to Spec. Don’t just tighten until it feels firm. Use a torque wrench to verify every fastener matches the manufacturer’s specifications. Over-tightening can crush roof channels, while under-tightening leads to catastrophic failure.
- Step 2: Precision Positioning. Aim for a central or slightly forward-biased position to keep your center of gravity stable. A tent sitting too far back can act like a lever, lifting weight off your front wheels and affecting steering.
- Step 3: Silence the Whistle. Wind noise isn’t just annoying; it’s a sign of wasted energy. Install wind deflector plates or “fairings” to direct air over the tent rather than letting it trap underneath.
- Step 4: The 100km Retighten. Vibrations from the road help bolts settle into place. We always pull over after the first 100km of a trip to retighten every single mounting point.
- Step 5: Monitor Your Range. Track your fuel consumption before and after installation. If your range drops significantly, it’s time to adjust your setup for better efficiency.
Optimising for Aerodynamics
A poorly positioned tent can increase your fuel consumption by up to 20%, which hits both your wallet and the environments we love to explore. The gap between your roof and the bottom of the rack is a major culprit for drag. By keeping the rack height as low as possible, we reduce the volume of air trapped under the tent. Responsible exploration starts with an aerodynamic vehicle setup that respects our natural resources by using less fuel. If you’re still deciding on the best tent to pair with a low-profile rack, our guide to roof top tents highlights models designed with slimline footprints.
Long-Term Maintenance for Remote Travel
Our adventures often take us to salt-heavy coastal tracks or dusty inland routes, both of which are tough on hardware. We recommend applying a specialized anti-seize lubricant to all bolts to prevent rust, especially if you enjoy beach camping. Constant vibrations on unsealed roads lead to “bolt creep,” where fasteners slowly back themselves out over time. A quick monthly check of your rack’s structural integrity ensures that your setup remains hardy and reliable. You can find more tips on maintaining your gear and accessories in our review of best 4wd awnings, which face similar environmental stresses.
Finding Your Perfect Setup with the Adventurerz Community
We’ve covered the technical side of choosing a roof rack for a rooftop tent, from dynamic loads to aerodynamic drag. Now, it’s time to talk about the most valuable resource in any expedition: the people you share the track with. We believe in a ‘test twice, buy once’ philosophy. This isn’t just about saving money; it’s about reliability in the most isolated corners of Australia. By leaning on peer reviews and real-world feedback from our community, you avoid the heartbreak of gear failure when you’re hundreds of kilometers from the nearest mechanic.
Our gear choices reflect our values. A durable, well-fitted rack reduces the risk of structural failure that can lead to trail litter or damaging the very environments we come to see. We encourage everyone to share their setup photos and hard-earned lessons on our community hub. Whether you’ve found a clever way to mount a shovel or a trick to stop a specific rack from whistling at 110km/h, your insights help the next explorer travel more safely and sustainably. We are all mentors on this shared path toward responsible exploration.
Planning your first remote mission with confidence is the ultimate goal. When you know your mounting system is over-engineered for the task and your tent is positioned for maximum efficiency, you can focus on the landscape rather than worrying about the roof. We’ve seen too many trips cut short by avoidable equipment stress. By following the professional standards we’ve laid out, you’re not just building a rig; you’re ensuring that the only impact you leave is the dust on your tires.
Join the Conversation
We’ve built a database of real-world gear stress tests where Adventurerz can report how their setups handle the brutal corrugations of the Oodnadatta Track or the salt spray of the Canning Stock Route. This collective knowledge is our greatest strength. We also invite you to get involved in our sustainable camping initiatives. These programs focus on leave-no-trace principles and help us protect the rugged geographic regions that define our Australian identity.
Ready to Head Out?
With your rack secured and your tent leveled, the horizon is calling. Check out our Ultimate Adventure Travel Planner to start mapping your 2026 remote escape with precision. If you’re still weighing up the final pieces of your kit, explore our detailed gear reviews before making your final purchase. We’re excited to see where your new setup takes you and look forward to hearing your stories from the road!
Gear Up for Your Next Great Escape
We’ve deconstructed the technical jargon and shared the hard-won secrets of successful remote touring. By mastering the balance between dynamic load ratings and your vehicle’s structural limits, you’ve taken the biggest step toward a safe and sustainable journey. Whether you’ve settled on the streamlined efficiency of heavy-duty crossbars or the versatile strength of a flat platform, your rig is now ready to handle the unique challenges of the Australian bush. Remember that choosing a roof rack for a rooftop tent is about more than just hardware; it’s about building a reliable foundation for years of responsible exploration.
We’re here to support every mile of your journey with gear reviews that are field-tested in remote Australia and shaped by community-driven feedback. Our focus on sustainable outdoor practices ensures we protect the wild places we love while pushing our boundaries. If you’re ready to complete your setup with a bed that’s as hardy as your new rack, Explore our expert-vetted Rooftop Tent recommendations. We’ll see you out on the tracks, Adventurerz!
Frequently Asked Questions
Can I put a rooftop tent on factory roof racks?
Most factory roof racks aren’t designed for the heavy dynamic loads required for a rooftop tent. While they might look sturdy, they often have low weight limits meant for surfboards or light luggage. You should check your vehicle’s manual for the specific dynamic rating. If it’s under 75kg, we strongly recommend upgrading to a dedicated aftermarket system to ensure your setup remains safe on the tracks.
How much weight can a standard roof rack hold while driving?
Standard aftermarket racks typically offer a dynamic load rating between 75kg and 100kg. This is the maximum weight you can safely carry while the vehicle is in motion. When you’re choosing a roof rack for a rooftop tent, remember that this figure must cover the weight of the tent, the rack itself, and any extra gear like shovels or recovery boards you’ve bolted on.
Do I need 2 or 3 crossbars for a rooftop tent?
We recommend using three crossbars for larger hard-shell tents or if you’re planning extensive travel on corrugated roads. While two bars are often sufficient for smaller soft-shell models, a third bar provides an extra mounting point that distributes weight more evenly. This reduces the stress on your vehicle’s roof channels and prevents the tent base from flexing during heavy vibrations in remote areas.
What happens if I exceed my vehicle’s dynamic roof load limit?
Exceeding the dynamic limit significantly compromises your vehicle’s handling and increases the risk of a rollover during emergency maneuvers. The extra weight makes the car top-heavy, which affects braking distances and cornering stability. Over time, this stress leads to cracked roof channels or pillar damage. It’s a risk that isn’t worth taking when we’re exploring isolated regions far from help.
How do I stop my roof racks from whistling with a tent on top?
Installing a wind fairing or a rubber wind-jamming strip is the most effective way to silence that annoying whistle. Whistling is caused by air rushing through the small gap between the rack and your roof. Many Adventurerz also use a simple community trick: wrapping a bungee cord or thick rope around the front crossbar to disrupt the airflow and break up the wind vibration.
Will a rooftop tent damage my car’s suspension over time?
A rooftop tent won’t cause immediate damage to healthy suspension, but the constant weight will accelerate the wear on your shocks and springs. Because the weight sits high up, your suspension works harder to control body roll. We suggest monitoring your ride height and considering a GVM-appropriate suspension upgrade if you plan on keeping the tent mounted for year-round adventures across Australia.
Are platform racks worth the extra money for camping?
Platform racks are definitely worth the investment for serious explorers who need durability and versatility. They offer a much larger surface area than bars, which spread the tent’s weight more effectively across the roof. When choosing a roof rack for a rooftop tent, the integrated T-slots on a platform make it much easier to securely mount awnings and solar panels without cluttering your setup.
How often should I check the bolts on my roof rack during a trip?
You should check your mounting hardware after the first 100km of any trip and then every morning when traveling on unsealed roads. Corrugations are notorious for vibrating bolts loose, no matter how tight they felt in the driveway. A quick five-minute check with a wrench keeps your rig hardy and ensures your tent stays exactly where it belongs while you’re chasing the horizon.