You just returned from a rainy weekend in the Otways and, despite your best intentions, you had to pack your gear away wet. Now, the dread sets in as you unzip the cover to find that telltale musty scent of mildew creeping into your fabric. It’s the nightmare of every Aussie explorer, but knowing how to clean a canvas roof top tent doesn’t have to be a stressful chore that ruins your factory waterproofing. We have all been there, staring at stubborn bird droppings and tree sap while wondering if a stiff brush will do more harm than good.
We understand that your RTT is more than just gear; it’s your sanctuary at the end of a dusty track. This guide will show you how to master the art of canvas maintenance to protect your investment and ensure your tent remains a reliable home for years of remote exploration. We’ll walk through the best technical cleaners for 2026, the secret to doubling your fabric’s life with UV-blocking treatments, and our proven methods for drying your tent in tight spaces so you can store your gear with absolute confidence. Let’s get to work, fellow Pathfinders!
Key Takeaways
- Learn why high-grade polycotton requires specialized care compared to synthetic fabrics to maintain its legendary durability and breathability.
- Master the essential steps of how to clean a canvas roof top tent, starting with a thorough dry brush and mattress removal to prevent moisture damage.
- Discover how to tackle aggressive mould and tree sap using eco-friendly vinegar solutions that protect the environment and your gear.
- Understand the science of re-seasoning and how to perform a simple “hose test” to ensure your sanctuary remains completely waterproof.
- Implement a post-trip checklist to manage condensation and ensure your tent is perfectly prepped for long-term storage between adventures.
Understanding Your Canvas Roof Top Tent’s Unique Needs
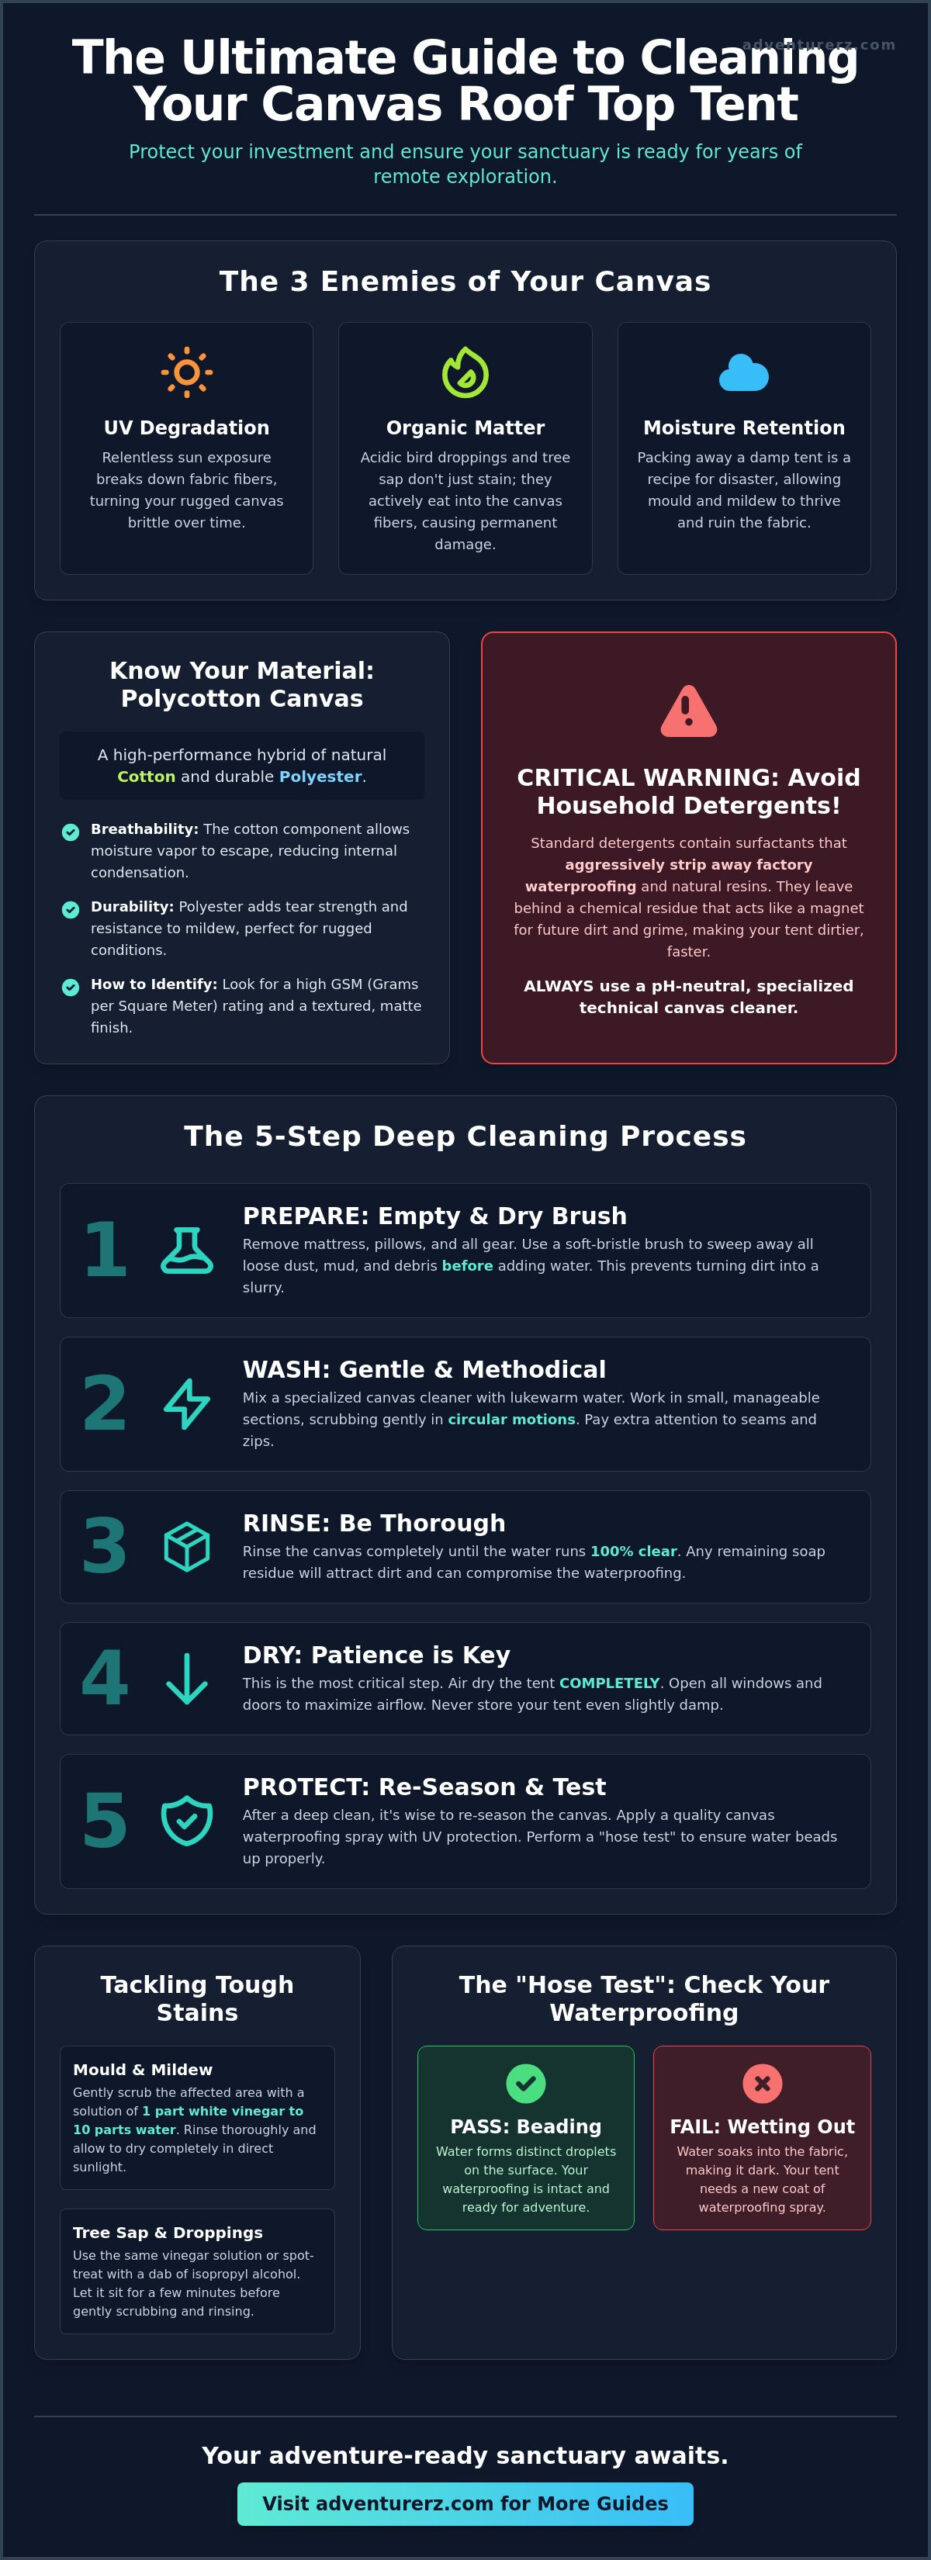
At Adventurerz, we believe gear stewardship is a core pillar of our environmental ethics. When we discuss how to clean a canvas roof top tent, we aren’t just talking about aesthetics; we are talking about the responsible preservation of a tool that allows us to explore the Australian wilderness. Your tent is a high-performance sanctuary. Unlike the thin, plastic-like feel of synthetic ground tents, modern roof top tents rely on a complex weave that balances protection with breathability. If we let dirt, salt, or organic debris sit on the surface, we aren’t just looking at a stain. We are looking at a clogged lung that can no longer “exhale” moisture, leading to the very condensation and mould issues we all want to avoid.
Our gear faces a brutal trio of enemies every time we head off the grid: UV degradation, organic matter, and moisture retention. The Australian sun is relentless, and without proper care, UV rays can bridge the gap between “rugged” and “brittle” faster than you might think. Meanwhile, bird droppings and tree sap are acidic. They don’t just sit on top; they eat into the fibres. By mastering how to clean a canvas roof top tent, you are actively fighting back against these elements to keep your gear in the field and out of the landfill. It is a methodical approach that respects the technical engineering of the fabric.
Polycotton vs. Pure Canvas: What Are You Cleaning?
Most high-end tents today use polycotton, a hybrid blend that merges the best of both worlds. While looking into modern tent materials, you’ll find that polycotton offers the classic feel of canvas with the added tear-strength and mildew resistance of polyester. You can usually identify your material by the Weight (GSM). A higher GSM means a thicker, more durable weave that requires more patience during the drying phase. If you’ve lost your manual, look for a textured, matte finish that feels slightly fuzzy to the touch; that is the cotton content waiting for your care.
Why Detergents are the Enemy of Canvas
Surfactants found in household detergents are designed to break down oils, which means they will aggressively strip away the natural resins and factory waterproofing that keep you dry during a midnight downpour. While “soap” is often made from natural fats and is gentle on fibres, “detergents” are synthetic chemical powerhouses that leave behind a microscopic residue. This residue acts like a magnet for dust and grime, ensuring your tent gets dirty even faster on your next trip. Stick to specialized technical cleaners to keep your sanctuary’s integrity intact.
The Step-by-Step Deep Cleaning Process
Before we even think about grabbing the hose, we need to strip the interior of our sanctuary. We always start by removing the mattress, pillows, and any internal gear. Leaving the mattress inside is a recipe for disaster; even a small amount of moisture transfer can lead to hidden mould growth underneath the foam. Once the tent is empty, we perform a thorough dry brush. This is the most underrated step in how to clean a canvas roof top tent. By using a soft-bristle brush to sweep away loose dust, dried mud, and cobwebs while the tent is dry, we prevent that debris from turning into a thick slurry once water is added. It’s a simple move that makes the actual wash much more effective.
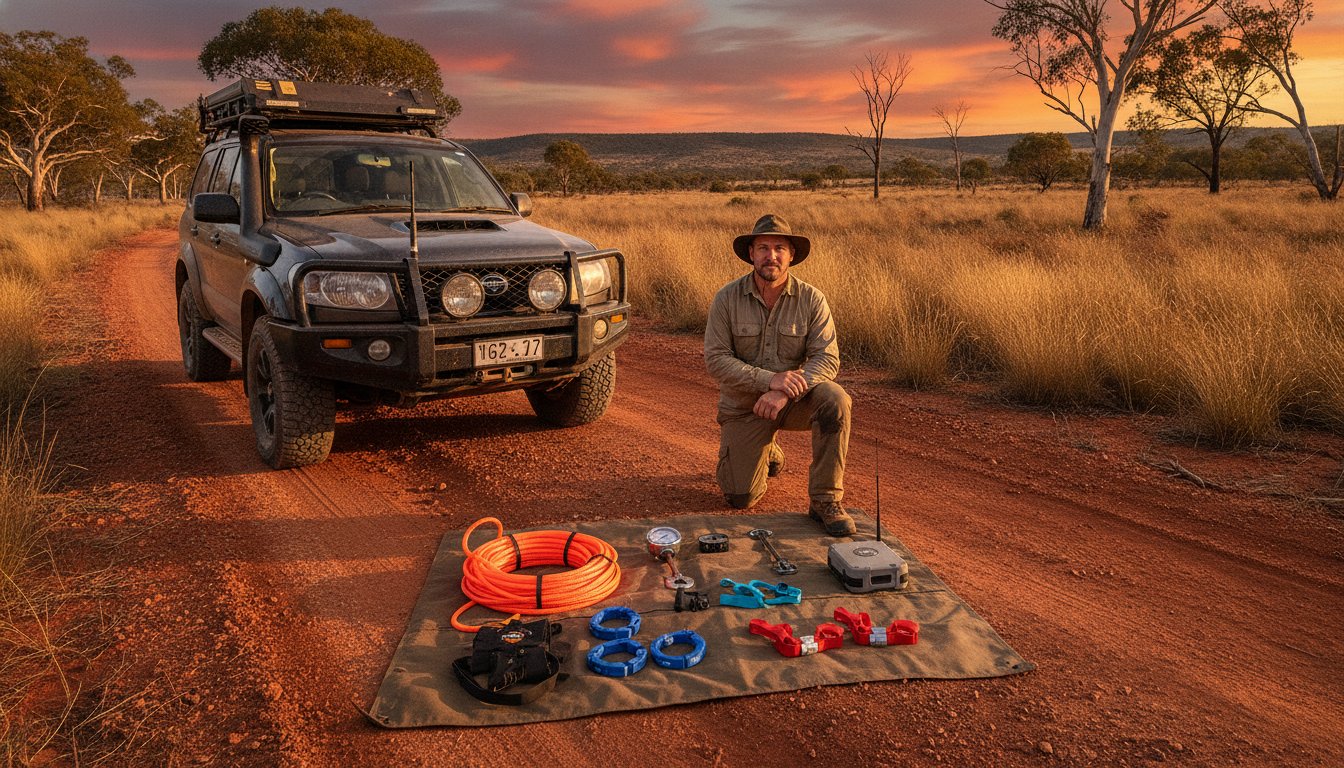
Setting Up Your Cleaning Station
Most of us clean our tents while they remain mounted on our vehicles, which saves our backs but requires a methodical setup. Safety is our priority here. We recommend using a sturdy telescopic ladder with wide feet to ensure stability on uneven driveways. When you start the wash, be mindful of where your water runoff goes. We want to avoid letting dirty, sediment-heavy water pool on our 4WD’s paintwork or run directly into local storm drains. A quick rinse of the vehicle’s roof and sides before you start can help the runoff slide away without leaving “mud tracks” on your pride and joy.
The “Adventurerz” Scrubbing Technique
We approach the wash in small, manageable sections to prevent the canvas from drying unevenly or leaving soap streaks. Using lukewarm water mixed with a specialized canvas-safe cleaner, we scrub in gentle circular motions. We pay extra attention to the seams and zips where grit likes to hide. This is also the perfect time to give your 4wd awnings a once-over with the same gentle technique. Once the scrubbing is done, we rinse the fabric until the water runs absolutely clear. If you see any bubbles or cloudiness, keep rinsing; chemical residue is a magnet for future dirt. If you’re looking to upgrade your setup before the next trip, check out our latest roof top tent reviews for the most durable models on the market.
The Critical Drying Window
Patience is a virtue, especially when learning how to clean a canvas roof top tent properly. We never pack down a damp tent. While it’s tempting to dry it in the harsh midday sun, we prefer a shaded spot with a strong natural breeze to prevent UV stress on the wet fibres. We use the “Hand Test” to verify the canvas core is dry: press your palm firmly against the thickest part of the fabric for ten seconds. If it feels even slightly cool or clammy, it isn’t ready. We leave the windows unzipped and may even use a portable fan to ensure those stubborn internal corners are bone dry before the final pack-down.
Dealing with Tough Stains: Mould, Mildew, and Sap
Even with a solid maintenance routine, the Australian bush has a way of leaving its mark on our gear. We’ve all pulled into a campsite under a majestic River Red Gum only to wake up to a roof covered in sticky sap and acidic bird droppings. While the deep cleaning process we covered earlier handles general grime, these stubborn invaders require a more surgical approach. The trick to how to clean a canvas roof top tent without causing permanent damage lies in identifying exactly what you’re up against. Surface dirt is a nuisance, but mould and mildew are living organisms that can eat through your sanctuary’s fibres if left unchecked.
If you spot dark, fuzzy patches or smell a persistent musty odour, you’re likely dealing with mould spores rather than just mud. We avoid bleach at all costs because it’s a harsh chemical that weakens cotton fibres and can lead to premature tearing. Instead, we turn to distilled white vinegar. It’s an eco-friendly powerhouse that kills 82% of mould species while remaining gentle on the environment and your fabric. If the staining is extensive or the mould has compromised the structural integrity of the weave, it may be time to consult a professional canvas restorer to save your investment.
The Mould and Mildew Recovery Plan
We start by mixing a solution of one part distilled white vinegar to four parts lukewarm water. We apply this directly to the affected area with a soft cloth, allowing it to sit for at least 15 minutes to penetrate the spores. This method kills the mould at the root without destroying the fabric’s hydrostatic head, which is the technical measure of how much water pressure the material can withstand before leaking. In humid climates like Tropical North Queensland, “black spot” mould can penetrate the weave and cause permanent staining if not treated immediately. Once the vinegar has done its work, we rinse the area thoroughly with fresh water and ensure the tent stays open until it’s completely dry.
Removing Organic Debris (Sap and Droppings)
Speed is our best friend when dealing with acidic bird droppings. We recommend spot-cleaning these as soon as you see them to prevent the acid from etching into the canvas. For stubborn tree sap, we use the “ice cube” method: hold an ice cube against the sap until it becomes brittle, then gently flake it off with a blunt spoon. This prevents you from smearing the resin deeper into the polycotton weave. We always neutralise the area with a quick wipe of plain water afterward to prevent “ring marks” from forming as the canvas dries. By being methodical, we keep our gear ready for the next ridge track.
Re-Seasoning and Protecting Your Canvas
After the deep scrub and stain removal we detailed in the previous sections, your canvas is at its most vulnerable. While learning how to clean a canvas roof top tent is vital for hygiene, understanding how to restore its natural defences is what separates a novice from a seasoned explorer. We use a process called seasoning to ensure the fabric remains water-tight. When cotton fibres get wet, they swell, physically closing the tiny gaps in the weave. If you’ve just performed a deep clean with technical soaps, those fibres have been stripped of their tension and natural oils. We need to reset them to ensure your sanctuary stays dry during the next coastal storm.
Seasoning isn’t just for brand-new gear; it’s a critical post-clean ritual. By wetting the fabric, we’re forcing the fibres to “learn” their expanded state again. This is also the perfect time to apply a high-quality UV protectant. The Australian sun is the primary cause of fabric degradation, but data shows that a single application of a UV-blocking waterproofer can double the effective life of your tent fabric. We consider this step an environmental duty, as it keeps your gear in the field and out of the landfill for twice as long. If you’re planning your next big trip, check out our latest roof top tent reviews to see which models offer the best factory-sealed seams for maximum protection.
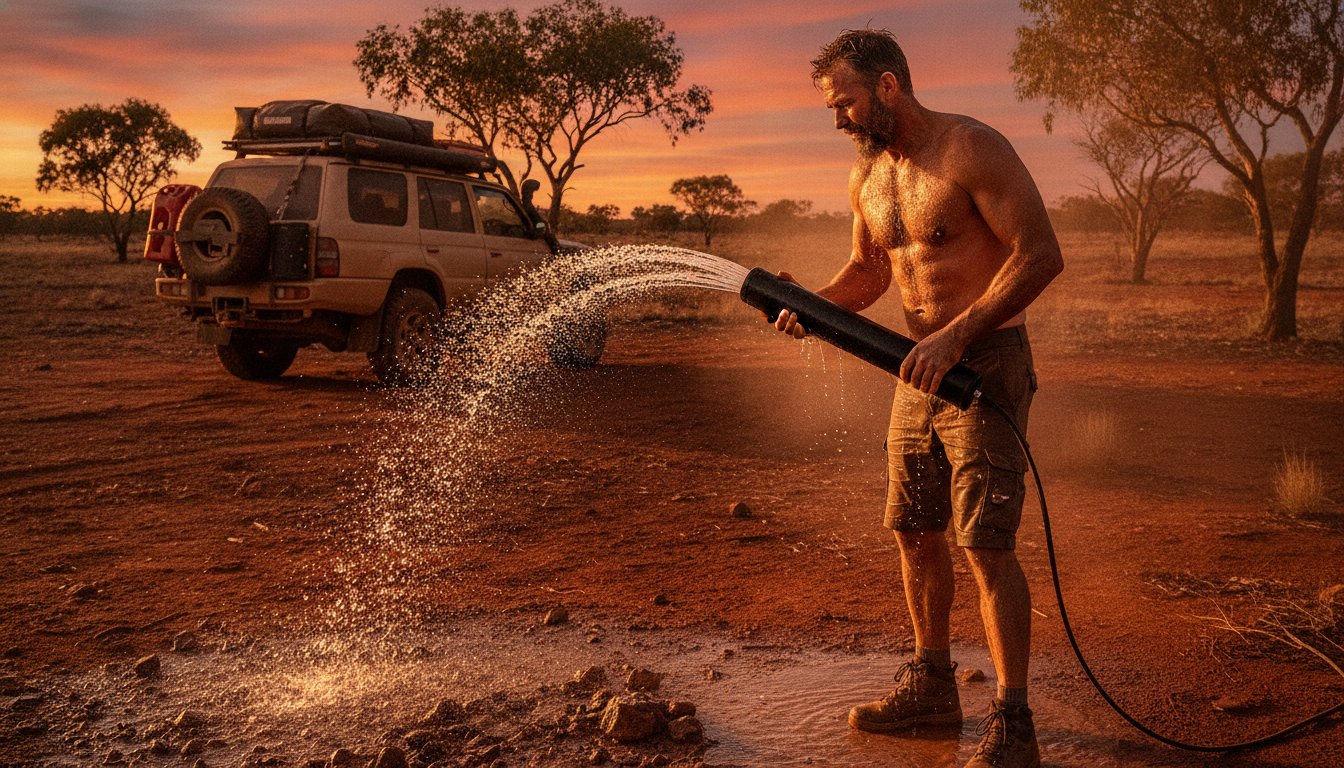
The Hose Ritual: How to Season Your Tent
We start by setting up a garden hose with a “shower” attachment to simulate a steady rain. We drench the entire tent, paying close attention to the roof and any vertical seams. Once the fabric is saturated, we let it dry completely in a shaded area. We repeat this cycle two or three times. During this process, we look for “weeping” seams, which are small droplets of water pushing through the stitching. If the leaking persists after three cycles, we apply a specialized wax-based seam sealer to the inside of the stitch line to achieve a 100% weatherproof seal.
Topical Waterproofing Applications
For modern polycotton blends, we recommend a fluoropolymer-based water repellent. These technical sprays provide a high-performance barrier that beads water away while allowing the fabric to breathe. We use a “cross-hatch” application method, spraying in horizontal passes followed by vertical ones to ensure we don’t miss a single millimetre of the weave. Safety is paramount here; always work in a well-ventilated area and avoid inhaling any aerosolised agents. This topical layer works in tandem with your 4wd awnings to create a complete weather-shield for your campsite, ensuring you stay dry regardless of what the Bureau of Meteorology throws your way.
Routine Maintenance and Storage for Longevity
We’ve mastered the deep scrub and the seasoning ritual, but the true test of gear stewardship happens in the weeks between adventures. Maintenance isn’t just an annual event; it’s a series of small, disciplined habits. We recommend a strict “Post-Trip Checklist” as soon as you pull back into the driveway. Check every corner for trapped moisture, shake out the grit from the baseboard tracks, and inspect the seams for any signs of stress. Catching a small sap spot or a damp patch now prevents it from becoming a permanent stain or a mould colony later. Knowing how to clean a canvas roof top tent is essential, but preventing the need for a heavy-duty scrub through proactive care is even better for your gear’s lifespan.
One often overlooked aspect of maintenance is zip care. Dust and salt are the primary killers of high-quality zips. We use a soft toothbrush to clear the teeth after every dusty trip and apply a light coating of paraffin wax or a dry silicone spray to keep them gliding smoothly. Avoid oil-based lubricants at all costs; they act like a magnet for Aussie bulldust, creating a grinding paste that will eventually strip the teeth. Once your gear is prepped and pristine, you can start mapping out your next remote escape with our travel planner.
Condensation Management Tips
Condensation is the silent killer of canvas roof top tents. It occurs when your body heat meets the cold external air, causing moisture to settle on the internal walls and under the mattress. We always use an anti-condensation mat; this creates a vital air gap that allows the baseboard to breathe. During cold-weather trips, we keep at least two windows slightly cracked at the top to create a cross-breeze. This small sacrifice in temperature significantly reduces the moisture load on the fabric. After you return home, always flip the mattress and let the baseboard dry in the sun for an hour before long-term storage.
Safe Storage Habits
When it’s time to pack the tent away for the off-season, the environment matters just as much as the tent’s condition. We never store our tents in sealed plastic bags or airtight containers. Canvas needs to breathe, and trapping it in plastic can create a micro-climate that invites mildew even if the tent felt dry. Rodent-proofing is another non-negotiable. Mice find polycotton canvas incredibly attractive for nesting, so we keep our storage areas clean and elevated. Finally, we practice the “Six-Month Open.” Even if we aren’t heading bush, we deploy the tent in the driveway every six months. This prevents the fabric from developing permanent creases and allows us to verify that our sanctuary remains in peak condition for the next ridge track.
Gear Up for the Next Ridge Track
Your roof top tent is more than just a place to sleep; it’s a testament to your commitment to responsible exploration. By mastering how to clean a canvas roof top tent, you’ve taken the most important step in extending the life of your gear and reducing your environmental footprint. From the initial dry brush to the final seasoning ritual, these field-tested maintenance protocols ensure your sanctuary remains weatherproof and ready for the toughest Australian conditions. We’ve built this guide using expert 4WD community advice to help you maintain peak performance while respecting the technical integrity of your fabric.
Now that your canvas is pristine and protected, it’s time to look toward the next horizon. If you’re looking to upgrade your setup or explore new gear options, check out our expert reviews on the best Roof Top Tents for 2026. Our sustainability-focused gear guides are designed to help you make informed choices that respect both your budget and the environment. Stay hardy, keep your gear ready, and we’ll see you out there on the tracks, Pathfinders!
Frequently Asked Questions
How often should I deep clean my canvas roof top tent?
You should deep clean your canvas roof top tent once or twice a year depending on how often you hit the tracks. If you’ve just returned from a coastal trip with high salt spray or a muddy inland expedition, a deep clean is essential to prevent long-term damage. Regular maintenance keeps your sanctuary in peak condition and ensures the fabric remains breathable for your next escape.
Can I use a pressure washer to clean my canvas tent?
No, you should never use a pressure washer on your canvas tent. The high-pressure stream can physically tear the cotton fibres and will almost certainly strip the factory waterproofing and seam seals. Stick to a garden hose with a gentle shower setting and a soft-bristle brush. This method is much safer for the fabric’s integrity and ensures your gear lasts for years of remote exploration.
Is it safe to use bleach on a polycotton canvas tent?
Bleach is definitely not safe for polycotton canvas as it’s a harsh chemical that weakens the natural fibres. Using bleach can lead to premature thinning of the fabric and may cause it to tear under tension. We recommend using eco-friendly alternatives like distilled white vinegar to kill mould spores. This approach protects your investment while remaining mindful of the environments we love to visit.
How do I remove the smell of mould or mildew from the canvas?
The best way to remove musty odours is by using a solution of one part distilled white vinegar to four parts water. Spray the mixture onto the affected area and let it air dry completely in a shaded, breezy spot. Vinegar is a natural deodoriser that kills the bacteria causing the smell. Mastering how to clean a canvas roof top tent involves treating these scents early before they become permanent.
Do I need to re-waterproof my tent every time I wash it?
You don’t need to re-waterproof every time, but you should perform a “hose test” after any deep scrub. If the water stops beading and begins to soak into the fabric, it’s time for a fresh coat of technical water repellent. Regular washing with specialized soaps usually preserves the coating, but heavy scrubbing often necessitates a quick re-application to maintain your sanctuary’s weather-shield.
What is the best way to clean the tent mattress and cover?
You should remove the foam core and wash the fabric mattress cover in a front-loading machine on a gentle cycle. For the PVC travel cover, a simple wash with lukewarm water and a soft cloth is usually enough to remove road grime. Always ensure the mattress cover is 100% dry before reinserting the foam to prevent moisture from being trapped against the tent’s baseboard.
Can I pack my tent away while it is still slightly damp?
Packing your tent away while it’s even slightly damp is the fastest way to invite mould and mildew growth. We always advocate for a “bone dry” pack-down. If you’re forced to pack up in the rain while camping, you must deploy the tent again within 24 hours to let it dry completely. This is the golden rule of how to clean a canvas roof top tent and maintain its longevity.